
Showing posts with label recipe. Show all posts
Showing posts with label recipe. Show all posts
Friday, October 25, 2013
Friday-Breakfast Mush
I have made this before, you can look Here for the recipe. I hope you enjoy this as much as my family does. Please don't let the name fool you, it really is amazing. It all comes together in one skillet, that means less dishes. Something I find truly amazing, because I'm the one who does the dishes around here!


Thursday, October 24, 2013
Thursday-Onion/Egg Casserole
Thursday-was my attempt to recreate a dish that someone brought to a fellowship that was amazing. Now it is still missing something-maybe I will be able to get the actual recipe from her some time, but for now here is mine. By the way it is still amazingly good-my husband said "make sure you write this one down it is amazing!"
Onion/Egg Casserole:
8 eggs
1 c milk
1 loaf onion or everything bread
1/2 package cream cheese
1/2 stick butter
1 lb shred cheese(I used colby jack)
1 tsp mustard powder
1tsp garlic powder
In a greased 13x9 pan, crumble up the bread and put in on the bottom, sprinkle half of the cheese over top of the bread. Add cream cheese on top dropping in tiny balls or crumbles. In a bowl mix together the eggs, milk , garlic, and mustard powder. Pour over top of the bread making sure to coat it all and get it in all of the corners. Top with remaining cheese. Bake at 350 covered for 30min and 15 minutes uncovered.

This was melt in your mouth good.
*This could also be made the night before, kept in the fridge all night, and then pop it into the oven the next morning!
Onion/Egg Casserole:
8 eggs
1 c milk
1 loaf onion or everything bread
1/2 package cream cheese
1/2 stick butter
1 lb shred cheese(I used colby jack)
1 tsp mustard powder
1tsp garlic powder
In a greased 13x9 pan, crumble up the bread and put in on the bottom, sprinkle half of the cheese over top of the bread. Add cream cheese on top dropping in tiny balls or crumbles. In a bowl mix together the eggs, milk , garlic, and mustard powder. Pour over top of the bread making sure to coat it all and get it in all of the corners. Top with remaining cheese. Bake at 350 covered for 30min and 15 minutes uncovered.

This was melt in your mouth good.
*This could also be made the night before, kept in the fridge all night, and then pop it into the oven the next morning!
Wednesday, October 23, 2013
Wednesday-French Toast Bake
This recipe was supposed to be one of our family friends, BUT my computer decided to act up and not let me on the internet...meaning I couldn't get to my email to find the recipe. I had to make this one up since I had no internet access-I will say this is my best one yet. I usually have something to go off of, but all I had on this one was my taste buds!
French Toast Bake:
3/4 Loaf of bread(just regular bread) or 1 loaf of day old french bread(didn't have that on hand so I used regular bread)
6 eggs
2 c milk
3/4 c sugar
2 tsp cinnamon
Topping:
1/2 c flour
1/2 c brown sugar
1 TBSP cinnamon
1 tsp nutmeg
1 sick cold butter
Apples(peeled and chopped) *optional, but highly recommended
Grease a 13x9 pan, cut or tear your bread. I cut mine because I am OCD like that(or as my husband likes to say CDO-because then it is in alphabetical order!) I was able to cut each slice of bread into 9 pieces, and I used about 3/4 of a loaf of bread.
 I didn't have any french bread on hand-but I do know that the family friend makes it with day old french bread-so feel free to go that direction as well!
Mix the eggs, milk, sugar, and cinnamon together, and then pour over top of the bread.
 Let this set for at least 1 hour-or overnight, in the fridge! (I made this up that morning and let it set until I was ready to pop it in the oven which gave it slightly over an hr to bake)

For the topping: Mix everything together except for the apples, and cut it all together until the butter chunks are really small, like pea sized or even smaller if you wish. I used my mixed on low to do this step since I didn't feel like cutting it with a knife(like usual), still had grumpy kids, so convienence was a must!(worked wonderfully, I will do it this way from now on, so I don't have to waste all that energy on cutting thru cold butter!)
 Assembly: Since you already have the eggs mixture and the bread together, right before you put it in the oven top with apples(if your not using apples, skip this step), then top with the crumbly buttery goodness!
 Bake at 350 for 45 minutes(this keeps it moist, if you like yours a bit firmer then cook it for longer) We like things underdone in this household, and this was not under done but was just perfect!

French Toast Bake:
3/4 Loaf of bread(just regular bread) or 1 loaf of day old french bread(didn't have that on hand so I used regular bread)
6 eggs
2 c milk
3/4 c sugar
2 tsp cinnamon
Topping:
1/2 c flour
1/2 c brown sugar
1 TBSP cinnamon
1 tsp nutmeg
1 sick cold butter
Apples(peeled and chopped) *optional, but highly recommended
Grease a 13x9 pan, cut or tear your bread. I cut mine because I am OCD like that(or as my husband likes to say CDO-because then it is in alphabetical order!) I was able to cut each slice of bread into 9 pieces, and I used about 3/4 of a loaf of bread.

Mix the eggs, milk, sugar, and cinnamon together, and then pour over top of the bread.


For the topping: Mix everything together except for the apples, and cut it all together until the butter chunks are really small, like pea sized or even smaller if you wish. I used my mixed on low to do this step since I didn't feel like cutting it with a knife(like usual), still had grumpy kids, so convienence was a must!(worked wonderfully, I will do it this way from now on, so I don't have to waste all that energy on cutting thru cold butter!)


Enjoy!
Tuesday, October 22, 2013
Tuesday-Mini Quiches
Tuesday-I needed something quick and easy due to melting children recovering from the flu. What threw some stuff together from the fridge/freezer and called it good. And you know what? It wasn't just good it was great!
Mini Quiches:
4 eggs
1/4 c milk
1/4 c frozen spinach(thawed)
1 tsp garlic
1 tsp onion
1/2 c cheese
1 pkg crescent rolls
*This makes 24 mini quiches!
First, I thawed the spinach-I simply put it in the microwave for 1 min and called it good.
While that was thawing, I mixed my eggs, milk, garlic, onion, and 1/4 c of cheese together. Then add in your spinach. Grease your mini muffin tin really well. Now for the "crust" for each section of crescent roll(meaning the two triangles that kind of come partially together), press the seams together, making a rectangular piece. Cut this in half and then in 3rds, giving you 6 pieces(for every 2 crescent rolls). Place these in the muffin tin. Pour the egg mixture over top. Add the rest of the cheese to the tops of them.
 Bake at 350 for 12 minutes. Quick, easy, and yummy. A bite sized lunch that was perfect for little fingers to eat.

*Note I would have loved to put bacon in these as well, just didn't have any on hand-but would definitely recommend adding some if you have some available, just for an extra little something!
Mini Quiches:
4 eggs
1/4 c milk
1/4 c frozen spinach(thawed)
1 tsp garlic
1 tsp onion
1/2 c cheese
1 pkg crescent rolls
*This makes 24 mini quiches!
First, I thawed the spinach-I simply put it in the microwave for 1 min and called it good.
While that was thawing, I mixed my eggs, milk, garlic, onion, and 1/4 c of cheese together. Then add in your spinach. Grease your mini muffin tin really well. Now for the "crust" for each section of crescent roll(meaning the two triangles that kind of come partially together), press the seams together, making a rectangular piece. Cut this in half and then in 3rds, giving you 6 pieces(for every 2 crescent rolls). Place these in the muffin tin. Pour the egg mixture over top. Add the rest of the cheese to the tops of them.


*Note I would have loved to put bacon in these as well, just didn't have any on hand-but would definitely recommend adding some if you have some available, just for an extra little something!
Monday, October 21, 2013
Monday-Strawberry Scones
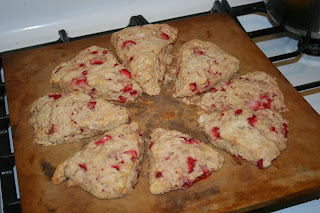
On Monday we had Strawberry Scones. This is not your average scone, it was moist and oh so very yummy! I couldn't get enough! To be honest my husband and I ate all 8 since the kiddos were still down with the stomach flu, and not up to eating much. I think they each maybe ate one bite! They did say they were yummy, but all done, which means this recipe also wins kid points!
Strawberry Scones:
1 c strawberries hulled and diced
2 c flour
1/3 c sugar
1 TBSP baking powder(yes a TBSP!)
1/4 tsp nutmeg(heavenly!)
6 TBSP cold butter, cut into 1/4" pieces
1/2 c whole milk(yes whole milk-it tastes better that way!)
1 tsp vanilla
Cut up your strawberries really small and place on a paper towel to dry-you don't want them too wet!
In a bowl combine flour, sugar, baking powder, and nutmeg. Cut in the butter until butter is the size of peas. You can do this by using to knifes or I use my kitchen aide on slow with the whisk attachment and it comes out fine, but you have to watch it to make sure it doesn't beat it all together, you don't want that. Add the strawberries and lightly mix with a fork-just enough to coat the strawberries. Mix the milk and vanilla together, put a well in the flour mixture, and pour the milk mixture into the well. Gently stir until it forms a ball. Knead this ball on a flour surface just a few times. Place onto baking stone and gently press it into an 8" circle. Using an oiled pizza cutter, slice it into 8 slices, and then gently move them away from each other so they are not touching. Bake at 425 for 18 minutes. Let cool for about 15 minutes. If you want to go the extra mile then cool it on a rack, I usually just let mine set on the pan I don't like the extra dishes and it does keep them a bit more moist!
Strawberry Scones:
1 c strawberries hulled and diced
2 c flour
1/3 c sugar
1 TBSP baking powder(yes a TBSP!)
1/4 tsp nutmeg(heavenly!)
6 TBSP cold butter, cut into 1/4" pieces
1/2 c whole milk(yes whole milk-it tastes better that way!)
1 tsp vanilla
Cut up your strawberries really small and place on a paper towel to dry-you don't want them too wet!
In a bowl combine flour, sugar, baking powder, and nutmeg. Cut in the butter until butter is the size of peas. You can do this by using to knifes or I use my kitchen aide on slow with the whisk attachment and it comes out fine, but you have to watch it to make sure it doesn't beat it all together, you don't want that. Add the strawberries and lightly mix with a fork-just enough to coat the strawberries. Mix the milk and vanilla together, put a well in the flour mixture, and pour the milk mixture into the well. Gently stir until it forms a ball. Knead this ball on a flour surface just a few times. Place onto baking stone and gently press it into an 8" circle. Using an oiled pizza cutter, slice it into 8 slices, and then gently move them away from each other so they are not touching. Bake at 425 for 18 minutes. Let cool for about 15 minutes. If you want to go the extra mile then cool it on a rack, I usually just let mine set on the pan I don't like the extra dishes and it does keep them a bit more moist!

Sunday, October 20, 2013
Sunday- Biscuit & Gravy, Bagels
We actually made two breakfast meals on Sunday(well technically 3 if you count actual breakfast as well!). We love breakfast food around here-don't you? To kick off Breakfast week today you get 2 recipes!
Biscuits and Gravy:
Butter Biscuits(usually I make them from scratch-didn't have time tonight,these came out of a can!)
1 lb Sausage
1/4 c flour
1 qt milk(I used whole, but use whatever you like or have on hand)
1 tsp pepper(I don't like pepper to spicy for me, so add more if you wish!)
Open up your can of biscuits and bake them according to package directions(really difficult right?!). OR if you wish make your own, go for it. I have a good recipe but of course can't seem to locate it currently(I guess that means I need to reorganize my cook book!)
Brown the Sausage in a skillet. Once it is completely browned sprinkle flour on top and mix well coating all the sausage. Add the milk and pepper. Stir occasionally until thick and bubbly! (this usually takes about 10min)

Homemade Bagels:
1 1/2 c lukewarm water
2 1/4 tsp active dry yeast(or one sml pkg)
4 TBSP sugar
3 3/4 c flour
1/4 c onion, chopped fine
1 tsp minced garlic
1 egg white
poppy seeds
sesame seeds
In a bowl mix together 1/4 c of the water with the yeast, mix it a bit and let set until foamy-usually about 5-10 minutes. Pour into mixing bowl. Add the sugar, flour, and remaining water, mix well. Add in 2 cups of the flour, onion, and garlic. Mix until well blended. Continue to add the rest of the flour in slowly this should form a dough that is firm enough to knead. Knead the dough on a well floured surface mix in any additional flour that is needed to keep it from sticking! It should hold the imprint of your hand when you are done.
Place the dough in a well greased bowl, turning over once to coat with oil. Cover with plastic wrap and let set for 1 hour or until doubled in size.
Punch dough down and knead for a few more times. Divide the dough into 8 equal pieces. Take one of the balls, and push your floured thumb thru the center and then stretch the hole out a bit, making it about 1" in diameter. (It should look like a doughnut) Place on a well floured surface and continue with the rest of the dough balls. Let these set. While the dough is setting bring a pot of water to boil. Once it is boiling drop them in one at a time, starting with the first one you put a hole in. Let it set in the boiling water for 30 seconds, flip it over with a slotted spoon and boil on the other side for 30 seconds. Place on a tea towel to absorb the extra water. Continue to do this with the remaining dough. Place on a well greased cookie sheet. (I did mine on a stone and they were a bit soft-we liked them this way, but if you prefer a firmer bagel then I suggest a cookie sheet would be better!)
In a bowl whisk the egg white until foamy. Spread over top of the bagels, then sprinkle with poppy and sesame seeds. Bake in the oven at 400 degrees for 20-25 minutes! Our baked for about 23 minutes!
 Spread some yummy goodness on top or just eat them the way they are. I used butter, and the hubby used a nice pile of cream cheese. These bagels are dense, filling, and wonderful. I hope you enjoy them as much as we did!! They are my attempt at a remake of Tim Hortons Everything Bagel-for those of you lucky enough to have one near you. I will say-these are better LOL!(per the hubby, but maybe he is just being nice!)
Biscuits and Gravy:
Butter Biscuits(usually I make them from scratch-didn't have time tonight,these came out of a can!)
1 lb Sausage
1/4 c flour
1 qt milk(I used whole, but use whatever you like or have on hand)
1 tsp pepper(I don't like pepper to spicy for me, so add more if you wish!)
Open up your can of biscuits and bake them according to package directions(really difficult right?!). OR if you wish make your own, go for it. I have a good recipe but of course can't seem to locate it currently(I guess that means I need to reorganize my cook book!)
Brown the Sausage in a skillet. Once it is completely browned sprinkle flour on top and mix well coating all the sausage. Add the milk and pepper. Stir occasionally until thick and bubbly! (this usually takes about 10min)

Enjoy!
Homemade Bagels:
1 1/2 c lukewarm water
2 1/4 tsp active dry yeast(or one sml pkg)
4 TBSP sugar
3 3/4 c flour
1/4 c onion, chopped fine
1 tsp minced garlic
1 egg white
poppy seeds
sesame seeds
In a bowl mix together 1/4 c of the water with the yeast, mix it a bit and let set until foamy-usually about 5-10 minutes. Pour into mixing bowl. Add the sugar, flour, and remaining water, mix well. Add in 2 cups of the flour, onion, and garlic. Mix until well blended. Continue to add the rest of the flour in slowly this should form a dough that is firm enough to knead. Knead the dough on a well floured surface mix in any additional flour that is needed to keep it from sticking! It should hold the imprint of your hand when you are done.
Place the dough in a well greased bowl, turning over once to coat with oil. Cover with plastic wrap and let set for 1 hour or until doubled in size.
Punch dough down and knead for a few more times. Divide the dough into 8 equal pieces. Take one of the balls, and push your floured thumb thru the center and then stretch the hole out a bit, making it about 1" in diameter. (It should look like a doughnut) Place on a well floured surface and continue with the rest of the dough balls. Let these set. While the dough is setting bring a pot of water to boil. Once it is boiling drop them in one at a time, starting with the first one you put a hole in. Let it set in the boiling water for 30 seconds, flip it over with a slotted spoon and boil on the other side for 30 seconds. Place on a tea towel to absorb the extra water. Continue to do this with the remaining dough. Place on a well greased cookie sheet. (I did mine on a stone and they were a bit soft-we liked them this way, but if you prefer a firmer bagel then I suggest a cookie sheet would be better!)
In a bowl whisk the egg white until foamy. Spread over top of the bagels, then sprinkle with poppy and sesame seeds. Bake in the oven at 400 degrees for 20-25 minutes! Our baked for about 23 minutes!

Thursday, September 19, 2013
No Bake Cookies
Ingredients:
1 3/4 c sugar
1/2 c milk
1/2 c butter(1 stick)
4 TBSP unsweetened cocoa powder
1/2 c crunch peanut butter
3 c quick cooking oats
1 tsp vanilla
1 3/4 c sugar
1/2 c milk
1/2 c butter(1 stick)
4 TBSP unsweetened cocoa powder
1/2 c crunch peanut butter
3 c quick cooking oats
1 tsp vanilla
Saturday, September 7, 2013
Featured...
A recipe of mine was posted on a friends blog...Go check the recipe out, I'm telling you it is amazing! It is for my Berry Streusel Muffin.
Thanks Cherise for sharing my recipe!
Here is a sneak peak at what they look like! Click on the link above to see the recipe!

Thanks Cherise for sharing my recipe!
Here is a sneak peak at what they look like! Click on the link above to see the recipe!

Wednesday, July 24, 2013
Banana Berry Freezer Jam
Banana Berry Jam
What you need:
Jars
Strawberries-3 cups, mashed(little over 2lbs)
Bananas-2(mashed)
Blueberries-1/2 cup(mashed)
Lemon Juice 2TBSP
Instant Pectin 6 TBSP
Sugar 2 cups

Step 1: You guessed it wash the jars!

Step 2: Wash and hull the strawberries

Step 3: Mash the berries one layer at a time, in a separate bowl mash the bananas and blueberries(add lemon juice and mix well)
Step 4: Mix Pectin and Sugar together in a big bowl, add the bananas and berries

Step 5: Stir for 3 minutes(my big helper, isn't he sweet?!)

Step 6: Pour into jars! Make sure you leave a 1/2" at the top so it can expand when frozen! Let stand for 30 minutes!
Step 7: Enjoy!!! Or you can keep it in the fridge for 3 weeks or the freezer for 1 year.
Now I have a freezer full of yummy jam to enjoy over the next year. I do love just plain raspberry, BUT since we are in the middle of Kansas they are too expensive to buy. Maybe someday soon we will plant some berry bushes/plants so I can pick my own again! Here's to wishful thinking!
Strawberry Freezer Jam
Strawberry Jam

Now this one I had to make the old fashion way because I ran out of instant pectin, and had bought my second container in regular(didn't check the label, oops!) After making one of this batch and then all the others using instant pectin-definitely prefer the instant, especially with small children around and a baby in the Moby wrap. Way easier to stick with the instant! This recipe is taken from the ball jar website with the elimination of lemon juice because we never added lemon juice growing up and it tasted just fine!
What you need:
2 c strawberries(mashed)-about 2 lbs1 box(6 TBSP) classic pectin
3/4 c water
4 cups sugar(a lot more than the instant variety, another reason to do instant)
jars!

Step 1: Wash jars!

Step 2: Wash and hull strawberries, easiest way to do this is with a straw!

Step:3 Mash strawberries, one layer at a time(much easier than trying to do them all at once-trust me). Combine with sugar, mix well. Let stand for 10 min
Step 4: In a small saucepan combine water and pectin. Bring to a rolling boil-stirring constantly. Once at a boil cook for 1 minute long-keep stirring :)
Step 5: Add to strawberry mixture and stir for 3 minutes

Step 6: Spoon into jars, place lids on top and let set for 30minutes. Make sure you leave 1/2" at the top so it can expand once frozen. Then move to fridge for up to 3 weeks or to the freezer for a year!
I know it really isn't too much harder-just hate the boiling water part(more stirring and dishes!). It turned out good. Can't wait to enjoy some of this yummy goodness on some sandwiches or toast!

Tuesday, July 23, 2013
Rasp/Peach Freezer Jam
Raspberry Peach Jam
What you need:
Peaches(chopped fine) 3 cups-about 1 1/5 lbs
Raspberries (mashed) 2 cups-about 2 pints
3 TBSP Lemon juice
6 TBSP Instant Pectin
2 cups sugar
Jars!

Step 1: You guessed it, wash the jars!


Step 2: Put water in a large pot and bring to a boil. Place peaches in pot for 30 seconds, then immediately move to ice bath.
Step 3: Peel and pit the peaches
Step 4: Mash the raspberries in a small bowl, Mash the peaches, but leave some chunks!

Step 5: In a large bowl combine peaches, raspberries, sugar, and lemon juice. Mix well and let stand for 10 minutes
Step 6: Add pectin and stir for 3 minutes
Step 7: Pour into jars

Step 8: Wipe off jars, place lid on top, and let stand for 30minutes.
You're done! Now you can either move it to the fridge(where it will be good for 3 weeks), or move it to the freezer where it will keep for 1 year (again, I have kept it longer and it has been fine!)
Monday, July 22, 2013
Peach/Peach Spice Freezer Jam
Peach Jam

Peaches (about 2lbs), when chopped fine 5 c of fruit
Sugar(2 cups)
6 TBSP Instant Pectin
3 TBSP Lemon Juice
Jars (of course)

Step 1: Wash Jars

Step 2: Bring a big pot of water to boil, then put the peaches in pot for 30 seconds

Step 3: Place the peaches immediately in ice water(this helps to shock them)
Peel and pit the peaches(the skin should fall right off making this step super easy)

Step 4: Mash the peaches with a potato masher-keep some chunks in it don't mush them too much!

Step 5: In a large bowl mix sugar, lemon juice, and peaches, mix well and let stand for 10 minutes
Step 6: Add in Pectin and stir for 3 minutes

Step 7: Pour into jars! Let stand for 30min(with lid on)
Step 8: Enjoy immediately keeps in fridge for 3 weeks or move to freezer will keep there for up to 1 year(Honestly I have kept them longer than this and they still taste good and no one has gotten sick!)
Guess what your done!! Simple enough right?! I love this new instant pectin-going to be my new favorite thing!
NOTE: I also made another batch, but I made it peach spice. After stirring in the pectin, I added 2 tsp of cinnamon and 1 tsp nutmeg. Let me tell you made it heavenly. Probably should have made both batches this way! Definitely worth trying-tastes like dessert!
Tuesday, June 11, 2013
Peach and Steak Kabobs
This was not a totally original idea that just came to me. I came across a recipe in a taste of homes magazine that I just got. I love those magazines...problem is when the time comes to make the actual recipe I have a hard time pulling out the book and going by what it says. All I noticed in the magazine was the picture and that it looked delicious. I decided to get to work and make some for the family sometime soon. Well that sometime soon came on Sunday June 2nd! Sorry no picture :( I wish I had one as they look just as good as they taste. I told my husband this is my new favorite summer time meal, as it tasted so fresh and was beyond yummy! He agreed(I love when he agrees-which is pretty much always does, but it's just nice to hear) Any way enough of me going on and I will get you the most amazing recipe EVER, ok maybe not ever but close enough!
Ingredients:
Sirloin Steak(cubed)
Peaches(canned in light syrup)-fresh would work better but I wanted the juice!
1/2 tsp ginger
1 tsp cinnamon
1 tsp garlic powder
2 TBSP peach jelly
Cube up your Sirloin(I had 1 lb) and place in a bowl. Open your can of peaches and pour a very small amount of the peach juice on your sirloin(see why I used canned instead of fresh, of course olive oil would work, but I wanted to be different), for this I used maybe 1-2 TBSP it wasn't much just something so the seasoning would stick a better. Add your ginger, cinn, and garlic powder to the steak and juice, mix it up well(I just used my hands, raw meat doesn't scare me). Now for the fun part...Since I used canned peaches they are juicy because of this I cut them in half because a whole peach slice kept falling off due to the weight and moisture. IF you use fresh peaches one slice should work just fine since they are more firm. On your kabob stick layer peach, steak, peach, steak...until you have what will fit on the kabob or how full you want it to be, ours had 3-4 of each per stick! Place them on the grill! They cook about 5 min per side, so nothing too long! You don't want to burn the steak or the peaches, just cook them! When they come off the grill spread peach jelly on top! Oh my goodness, heavenly, sweet, just amazing!
The kids really enjoyed this recipe and ate all the steak and peaches. The steak is sweet, but not too sweet, a very different flavor for me, but it was so very good. I'm sure we will be making these a lot this summer since they are so amazing. Maybe next time I can get a picture up on here so you can see them in all their awesomeness! I am going to go back to the original recipe sometime here soon and see how close they are to each other. I'm pretty sure the recipe didn't have cinnamon in it and it said to use some type of peach salsa as well-but again not positive as I briefly glanced it over, thought it looked good, and made my own!
Ingredients:
Sirloin Steak(cubed)
Peaches(canned in light syrup)-fresh would work better but I wanted the juice!
1/2 tsp ginger
1 tsp cinnamon
1 tsp garlic powder
2 TBSP peach jelly
Cube up your Sirloin(I had 1 lb) and place in a bowl. Open your can of peaches and pour a very small amount of the peach juice on your sirloin(see why I used canned instead of fresh, of course olive oil would work, but I wanted to be different), for this I used maybe 1-2 TBSP it wasn't much just something so the seasoning would stick a better. Add your ginger, cinn, and garlic powder to the steak and juice, mix it up well(I just used my hands, raw meat doesn't scare me). Now for the fun part...Since I used canned peaches they are juicy because of this I cut them in half because a whole peach slice kept falling off due to the weight and moisture. IF you use fresh peaches one slice should work just fine since they are more firm. On your kabob stick layer peach, steak, peach, steak...until you have what will fit on the kabob or how full you want it to be, ours had 3-4 of each per stick! Place them on the grill! They cook about 5 min per side, so nothing too long! You don't want to burn the steak or the peaches, just cook them! When they come off the grill spread peach jelly on top! Oh my goodness, heavenly, sweet, just amazing!
The kids really enjoyed this recipe and ate all the steak and peaches. The steak is sweet, but not too sweet, a very different flavor for me, but it was so very good. I'm sure we will be making these a lot this summer since they are so amazing. Maybe next time I can get a picture up on here so you can see them in all their awesomeness! I am going to go back to the original recipe sometime here soon and see how close they are to each other. I'm pretty sure the recipe didn't have cinnamon in it and it said to use some type of peach salsa as well-but again not positive as I briefly glanced it over, thought it looked good, and made my own!
Thursday, April 11, 2013
Steak and Onions
I am going to preface this by saying this is one of the best steaks I have ever made and it is great in the summer time when you would rather cook outside on the grill then inside!
1 10oz Sirloin(we always split one)
1 tsp garlic powder
1 tsp onion powder
2 TBSP Warshester sauce
2 tsp A1 sauce
1 tsp McCormic girll mates for steak
1/4 c French Fried onions
1 small onion sliced
1 Tsp olive oil
1/4 c white cooking wine
1 tsp sugar
Garlic Butter:
1 garlic clove minced
1/2 tsp basil
1/2 tsp parsley
1/2 tsp oregano
1/2 tsp thyme
4 TBSP butter softened
Alright now that we have all the ingredients(I know it looks like you need a lot, but I promise it is well worth it), we are going to start by marinating the steak. Put the steak in a Ziploc bag or in a big bowl which ever you prefer and add the next 5 ingredients. Let this marinate for at least an hour, but the longer the better, so if you want to get it ready the night before even better!
Next, we are going to caramelize the onion, so in a small sauce pan put the olive oil, white cooking wine, sugar, and onion. You are going to cook these until they are nice and caramelized, cook on a low heat and mix on occasion so it doesn't burn and stick to the pan. If you need to add more olive oil as it cooks out go ahead, but don't drown it. This takes about 20-30min, just so you are aware.
Depending on how you like your steak cooked that will be when you need to throw the steak on while your onions are caramelizing. I like mine med rare, so I put it on when they have about 10minutes left.
Make your garlic butter, by combining all your ingredients together in a small bowl.

Now to assemble. Put the caramelized onions on the bottom of the plate, go get your steak off the grill and place on top of the onions. While your steak is still hot put the butter mixture on top and then last but not least put the french fried onions on that.

This steak is to die for! At least in my opinion and I don't even really like onions. This is my attempt at recreating the onion brewsky sirloin from Logan's Steakhouse. My husband thinks it tastes better, but I'm sure he has to say that!
1 10oz Sirloin(we always split one)
1 tsp garlic powder
1 tsp onion powder
2 TBSP Warshester sauce
2 tsp A1 sauce
1 tsp McCormic girll mates for steak
1/4 c French Fried onions
1 small onion sliced
1 Tsp olive oil
1/4 c white cooking wine
1 tsp sugar
Garlic Butter:
1 garlic clove minced
1/2 tsp basil
1/2 tsp parsley
1/2 tsp oregano
1/2 tsp thyme
4 TBSP butter softened
Alright now that we have all the ingredients(I know it looks like you need a lot, but I promise it is well worth it), we are going to start by marinating the steak. Put the steak in a Ziploc bag or in a big bowl which ever you prefer and add the next 5 ingredients. Let this marinate for at least an hour, but the longer the better, so if you want to get it ready the night before even better!
Next, we are going to caramelize the onion, so in a small sauce pan put the olive oil, white cooking wine, sugar, and onion. You are going to cook these until they are nice and caramelized, cook on a low heat and mix on occasion so it doesn't burn and stick to the pan. If you need to add more olive oil as it cooks out go ahead, but don't drown it. This takes about 20-30min, just so you are aware.
Depending on how you like your steak cooked that will be when you need to throw the steak on while your onions are caramelizing. I like mine med rare, so I put it on when they have about 10minutes left.
Make your garlic butter, by combining all your ingredients together in a small bowl.

Now to assemble. Put the caramelized onions on the bottom of the plate, go get your steak off the grill and place on top of the onions. While your steak is still hot put the butter mixture on top and then last but not least put the french fried onions on that.

This steak is to die for! At least in my opinion and I don't even really like onions. This is my attempt at recreating the onion brewsky sirloin from Logan's Steakhouse. My husband thinks it tastes better, but I'm sure he has to say that!
Friday, August 31, 2012
Peach/Strawberry Cake
1 c butter softened
1 c sugar
2 egg
3 c self rising flour
2 tsp vanilla
Berry Sauce:
1 c water
2 TBSP corn starch
2 TBSP sugar
2 c strawberries
1 c peaches, peeled and sliced.
In a saucepan combine the water, cornstarch and sugar. Stir until all is dissolved and it starts to get thick. Add the strawberries and peaches. Cook until tender and well blended!
In a 9x13 pan place the berry sauce on the bottom. Then in a mixer combine the sugar and butter until fluffy. Add in the egg, flour, and vanilla. Stir until well blended. Pour over top of the berry sauce. Bake at 350 for 20-30min. The top should be a light golden brown.
This is so amazing! The top is between a strawberry shortcake and a yellow cake mix, it is so good! It looks like a cobbler, but tastes like a cake-doesn't get much better than that!
Enjoy. Sorry I don't have a picture my husband devoured this before I had a chance to get to it!! It was so yummy. This would be so yummy with blueberries, or really any kind of fruit we just happened to have peaches and strawberries and man was it soo good. It is really sweet so have some water or milk on hand.
1 c sugar
2 egg
3 c self rising flour
2 tsp vanilla
Berry Sauce:
1 c water
2 TBSP corn starch
2 TBSP sugar
2 c strawberries
1 c peaches, peeled and sliced.
In a saucepan combine the water, cornstarch and sugar. Stir until all is dissolved and it starts to get thick. Add the strawberries and peaches. Cook until tender and well blended!
In a 9x13 pan place the berry sauce on the bottom. Then in a mixer combine the sugar and butter until fluffy. Add in the egg, flour, and vanilla. Stir until well blended. Pour over top of the berry sauce. Bake at 350 for 20-30min. The top should be a light golden brown.
This is so amazing! The top is between a strawberry shortcake and a yellow cake mix, it is so good! It looks like a cobbler, but tastes like a cake-doesn't get much better than that!
Enjoy. Sorry I don't have a picture my husband devoured this before I had a chance to get to it!! It was so yummy. This would be so yummy with blueberries, or really any kind of fruit we just happened to have peaches and strawberries and man was it soo good. It is really sweet so have some water or milk on hand.
Tuesday, August 28, 2012
Cobbler
This is one of the best cobbler recipes, and no it's not because I'm biased it just really is amazing. I'm picky about my food, I don't like it to taste too much like a bread or a biscuit because then that just ruins it for me. My camera has been out of commission so I apologize for the lack of pictures lately.
8 TBSP butter
1.5 c self rising flour
1 c sugar
1.5 c milk
1 tsp vanilla
1/2 tsp almond flavoring
4 c fruit of your choice(I have used blueberry, peach, and pear-all amazing)
1/2 c water
1/4 c sugar
In a sauce pan combine the water, sugar, and fruit stir well until it comes to a boil.
In a 9x13 pan place the butter in the pan and put in the oven to melt. Bake at 350! While that is melting combine the flour, sugar, milk, vanilla, and almond in a bowl, mix well so there are no chunks in it! Once the butter is melted, take pan out of over, pour mix over top of butter. Then scoop berries(fruit) over top of batter, then slowly pour sauce over top of berries. I would place a pan below this in the over just in case it overflows-all of mine did just a tad! Bake for 30 minutes.
Oh my goodness is this heavenly! It is moist and yummy, I will try and get a picture up here the next time I make it when I have my camera back.
8 TBSP butter
1.5 c self rising flour
1 c sugar
1.5 c milk
1 tsp vanilla
1/2 tsp almond flavoring
4 c fruit of your choice(I have used blueberry, peach, and pear-all amazing)
1/2 c water
1/4 c sugar
In a sauce pan combine the water, sugar, and fruit stir well until it comes to a boil.
In a 9x13 pan place the butter in the pan and put in the oven to melt. Bake at 350! While that is melting combine the flour, sugar, milk, vanilla, and almond in a bowl, mix well so there are no chunks in it! Once the butter is melted, take pan out of over, pour mix over top of butter. Then scoop berries(fruit) over top of batter, then slowly pour sauce over top of berries. I would place a pan below this in the over just in case it overflows-all of mine did just a tad! Bake for 30 minutes.
Oh my goodness is this heavenly! It is moist and yummy, I will try and get a picture up here the next time I make it when I have my camera back.
Thursday, August 23, 2012
Parmesan Crusted Chicken Legs
1 c Parmesan Cheese
1/4 c Italian Bread Crumbs
1 tsp oregano
1/4 tsp parsley
1 tsp garlic powder
1 tsp onion powder
1 egg
splash of milk
4 chicken legs
Take your egg and milk and mix together in a bowl. Add the dry ingredients together in a bowl and mix. Dip your chicken leg first in the egg mixture and coat it well. Then roll it around in all the dry ingredients, make sure the whole leg is covered as good as possible. Place in a baking dish (8x8 works marvelously). Bake at 400 for 45 minutes.
This is absolutely so amazing, my husband ate 3 of the 4! My camera is still out of commission so when I make this again I will try and get a picture up asap. (ugh I hate not having pictures)
1/4 c Italian Bread Crumbs
1 tsp oregano
1/4 tsp parsley
1 tsp garlic powder
1 tsp onion powder
1 egg
splash of milk
4 chicken legs
Take your egg and milk and mix together in a bowl. Add the dry ingredients together in a bowl and mix. Dip your chicken leg first in the egg mixture and coat it well. Then roll it around in all the dry ingredients, make sure the whole leg is covered as good as possible. Place in a baking dish (8x8 works marvelously). Bake at 400 for 45 minutes.
This is absolutely so amazing, my husband ate 3 of the 4! My camera is still out of commission so when I make this again I will try and get a picture up asap. (ugh I hate not having pictures)
Monday, August 20, 2012
Garlic Butter Salmon
1 Fillet Salmon(about 1lb)2 TBSP butter
3 garlic cloves, minced
2 TBSP onion, chopped fine
2 tsp oregano
1 tsp parsley
1 tsp basil
1/2 c whole milk
1/4 c white cooking wine(or regular wine if you prefer)
1 TBSP olive oil
 In a saucepan put the butter, onion, and garlic. Cook for about 3 minutes stirring often. Add the milk and wine. Stir well. Add the spices. Let this cook on low until it is a thick sauce and a lot of the liquid has cooked out. (This process takes about 20min)
Put the salmon on the grill, brush with olive oil and sprinkle with some seasoned salt(if you wish). Cook salmon for 15min.
*We don't ever flip the salmon and we always buy it with the skin on, so we put the skin side on the grill!
Remove salmon from the grill and immediately cover with the garlic butter sauce! This makes it so moist and flavorful. This is our family's favorite way to eat salmon(and we have several good stand by recipes as we LOVE salmon around here)
Side Note: This is also amazing on grilled pork chops!
3 garlic cloves, minced
2 TBSP onion, chopped fine
2 tsp oregano
1 tsp parsley
1 tsp basil
1/2 c whole milk
1/4 c white cooking wine(or regular wine if you prefer)
1 TBSP olive oil

Put the salmon on the grill, brush with olive oil and sprinkle with some seasoned salt(if you wish). Cook salmon for 15min.
*We don't ever flip the salmon and we always buy it with the skin on, so we put the skin side on the grill!
Remove salmon from the grill and immediately cover with the garlic butter sauce! This makes it so moist and flavorful. This is our family's favorite way to eat salmon(and we have several good stand by recipes as we LOVE salmon around here)
Side Note: This is also amazing on grilled pork chops!
Tuesday, August 14, 2012
Shepherd's Pie
1 lb ground beef
tomato sauce(recipe below, or you can use a can)
5 cloves of garlic, divided, minced
4 TBSP chopped onion
1 oz bag of mixed veggies(I used green beans, peas, carrots, and corn)
2 TBSP Worcester sauce
1/4 c water
4 TBSP butter, divided
4 potatoes, peeled and cut
1/4 c sour cream
1/2 c shredded cheese( I used colby jack)
 Place the potatoes in a sauce pan and cover with a with water(fill about 1" above the potatoes) Bring to a boil and cook until potatoes are soft. This usually takes 15-20 min.
While the potatoes are cooking put 3 TBSP butter, onion, and 3 garlic cloves(minced) in a skillet and cook for about 2 min. Add in the ground beef. When the beef is all browned, add veggies, water, Worcester sauce,and tomato sauce. Cook until the veggies are tender. Place in the bottom of a 9x11 pan.
Now on to finishing up the potatoes, once they are soft put the potatoes in a mixer(or a bowl if you are going to hand mix them), add sour cream, 2 (minced) garlic cloves, and 1 TBSP butter. Beat until they are creamy and fluffy. Put this over top of your meat and veggie mixture.
Next put the shredded cheese all over the top of the potatoes. Place in the oven at 350 for 20min or until all the cheese is melted.
ENJOY!
Tomato Sauce
1 tsp basil
1 tsp oregano
1 tsp parsley
10 Roma tomatoes
First, you are going to blanch the tomatoes. To do this bring a pot of water to boil. Then add the tomatoes. Keep them in the water for 1 minute. Next transfer the tomatoes to a bowl of cold water. Let them set for about 1 minute in the cold water. Then you just peel the skins right off! When they are warm the seeds just fall right out of them, and I like as little seeds as possible in my tomato sauce!
In a blender or food processor, place the tomatoes, and the herbs. Blend until well mixed and sauce like. You are done and have a wonderful fresh tomato sauce. If you have fresh herbs it will taste even better!
tomato sauce(recipe below, or you can use a can)
5 cloves of garlic, divided, minced
4 TBSP chopped onion
1 oz bag of mixed veggies(I used green beans, peas, carrots, and corn)
2 TBSP Worcester sauce
1/4 c water
4 TBSP butter, divided
4 potatoes, peeled and cut
1/4 c sour cream
1/2 c shredded cheese( I used colby jack)

While the potatoes are cooking put 3 TBSP butter, onion, and 3 garlic cloves(minced) in a skillet and cook for about 2 min. Add in the ground beef. When the beef is all browned, add veggies, water, Worcester sauce,and tomato sauce. Cook until the veggies are tender. Place in the bottom of a 9x11 pan.
Now on to finishing up the potatoes, once they are soft put the potatoes in a mixer(or a bowl if you are going to hand mix them), add sour cream, 2 (minced) garlic cloves, and 1 TBSP butter. Beat until they are creamy and fluffy. Put this over top of your meat and veggie mixture.
Next put the shredded cheese all over the top of the potatoes. Place in the oven at 350 for 20min or until all the cheese is melted.
ENJOY!
Tomato Sauce
1 tsp basil
1 tsp oregano
1 tsp parsley
10 Roma tomatoes
First, you are going to blanch the tomatoes. To do this bring a pot of water to boil. Then add the tomatoes. Keep them in the water for 1 minute. Next transfer the tomatoes to a bowl of cold water. Let them set for about 1 minute in the cold water. Then you just peel the skins right off! When they are warm the seeds just fall right out of them, and I like as little seeds as possible in my tomato sauce!
In a blender or food processor, place the tomatoes, and the herbs. Blend until well mixed and sauce like. You are done and have a wonderful fresh tomato sauce. If you have fresh herbs it will taste even better!
Thursday, August 9, 2012
Baked Bbq Spare Ribs
1/2 18 oz bottle BBQ sauce(I used Kraft honey)
3 spare ribs(I forget the lbs but they were big)
1 tsp garlic powder
1 tsp onion powder
1/2 tsp seasoned salt
water
Place the ribs in a 9x11 baking pan. Fill the pan with water so that the ribs are about 1/2 way covered in water. Sprinkle with the garlic, onion, and salt. Bake at 250 for 1 hour. Turn the meat over at 30 min. When cooking for an hour, take the ribs out and drain the water from the pan. Turn the oven up to 400. Pour BBQ sauce over the ribs. Bake for 30min. The ribs should be nice and tender!
These were sooo good. I had to come up with a baked recipe because we ran out of propane the day before. This would be perfect in the winter when you don't want to go outside and grill.
3 spare ribs(I forget the lbs but they were big)
1 tsp garlic powder
1 tsp onion powder
1/2 tsp seasoned salt
water
Place the ribs in a 9x11 baking pan. Fill the pan with water so that the ribs are about 1/2 way covered in water. Sprinkle with the garlic, onion, and salt. Bake at 250 for 1 hour. Turn the meat over at 30 min. When cooking for an hour, take the ribs out and drain the water from the pan. Turn the oven up to 400. Pour BBQ sauce over the ribs. Bake for 30min. The ribs should be nice and tender!
These were sooo good. I had to come up with a baked recipe because we ran out of propane the day before. This would be perfect in the winter when you don't want to go outside and grill.
Subscribe to:
Posts (Atom)