Showing posts with label sewing. Show all posts

Thursday, September 5, 2013

Pillow Case Dress- 12months

Pillow Case Dress:
I love these because they are super simple and they are quick!  I made one for Athaiah to wear to a bridal shower to go with my maxi dress!  It was a lot of fun and I will definitely be making more.  You do not necessarily have to use a pillow case you can obviously just use some fabric, but I found the pillowcases on sale and loved the cute little pattern!
 
What you will need:
Pillowcase(or fabric if you are going that route)
Ribbon-cut 2 equal pieces twice the length of her neck-or greater for a bigger bow
A dress of current size(for measurement purposes)
 
First step:  Cut out your dress.  To do this I placed a dress that currently fit her on top of the pillowcase.  Fold the pillow case in half width ways, that way you just measure half the dress and you won't have as many seams to sew up! Easier is always better in my book!  Make sure you add 1/2" all the way around for seam allowance.
 Second Step:  Cut it out! Easy enough, right?!
 Third Step: Sew up the sides with the right sides of the fabric together. But do not sew the part where the arms would be or the top part(along the neckline)  When you get to the arm holes, sew up each side(top and bottom) separately, this will make a nice seam ensuring you don't have any rough edges. But will keep the arms open so it is easy to slip on and makes the ribbons the top of the "arm hole."
 Fourth Step:  Cut out a piece of ribbon for the neck line.  I did one piece for the back and one for the front so it can tie together at the sleeves.  You can use any size of ribbon you like. I did super skinny ribbon because Athaiah has super, super petite shoulders and I thought a big ribbon might be overwhelming on her little arms.
Fifth Step: Fold the top piece of the fabric down 1/4"(I recommend ironing so it stays nice and straight). This is so there is no fraying fabric.  Fold the fabric down again the width of your ribbon(mine was another 1/4").  Lay your ribbon inside the flap(This eliminates having to string it thru later, but if you prefer that method by all means go ahead, I just like to cut out as many steps as possible) See picture below!

Sixth Step: Now sew along the bottom, ensure the ribbon is tucked inside, but don't sew the ribbon.  You need the ribbon to be able to move some! Center your ribbon in the sleeve with extra on either side, sew a line down the center(top-bottom) this will hold the ribbon inside the sleeve but still enable you to gather it at the sleeve so it can fit your sweet little one!
Do this again with the back piece!
 No need to hem the bottom if you used the bottom of the pillowcase.  I made sure that I did to eliminate another step of sewing, keep it simple.  That is the point of these dresses to be extremely simple!!


Tuesday, August 27, 2013

Easter outfits-tutorial

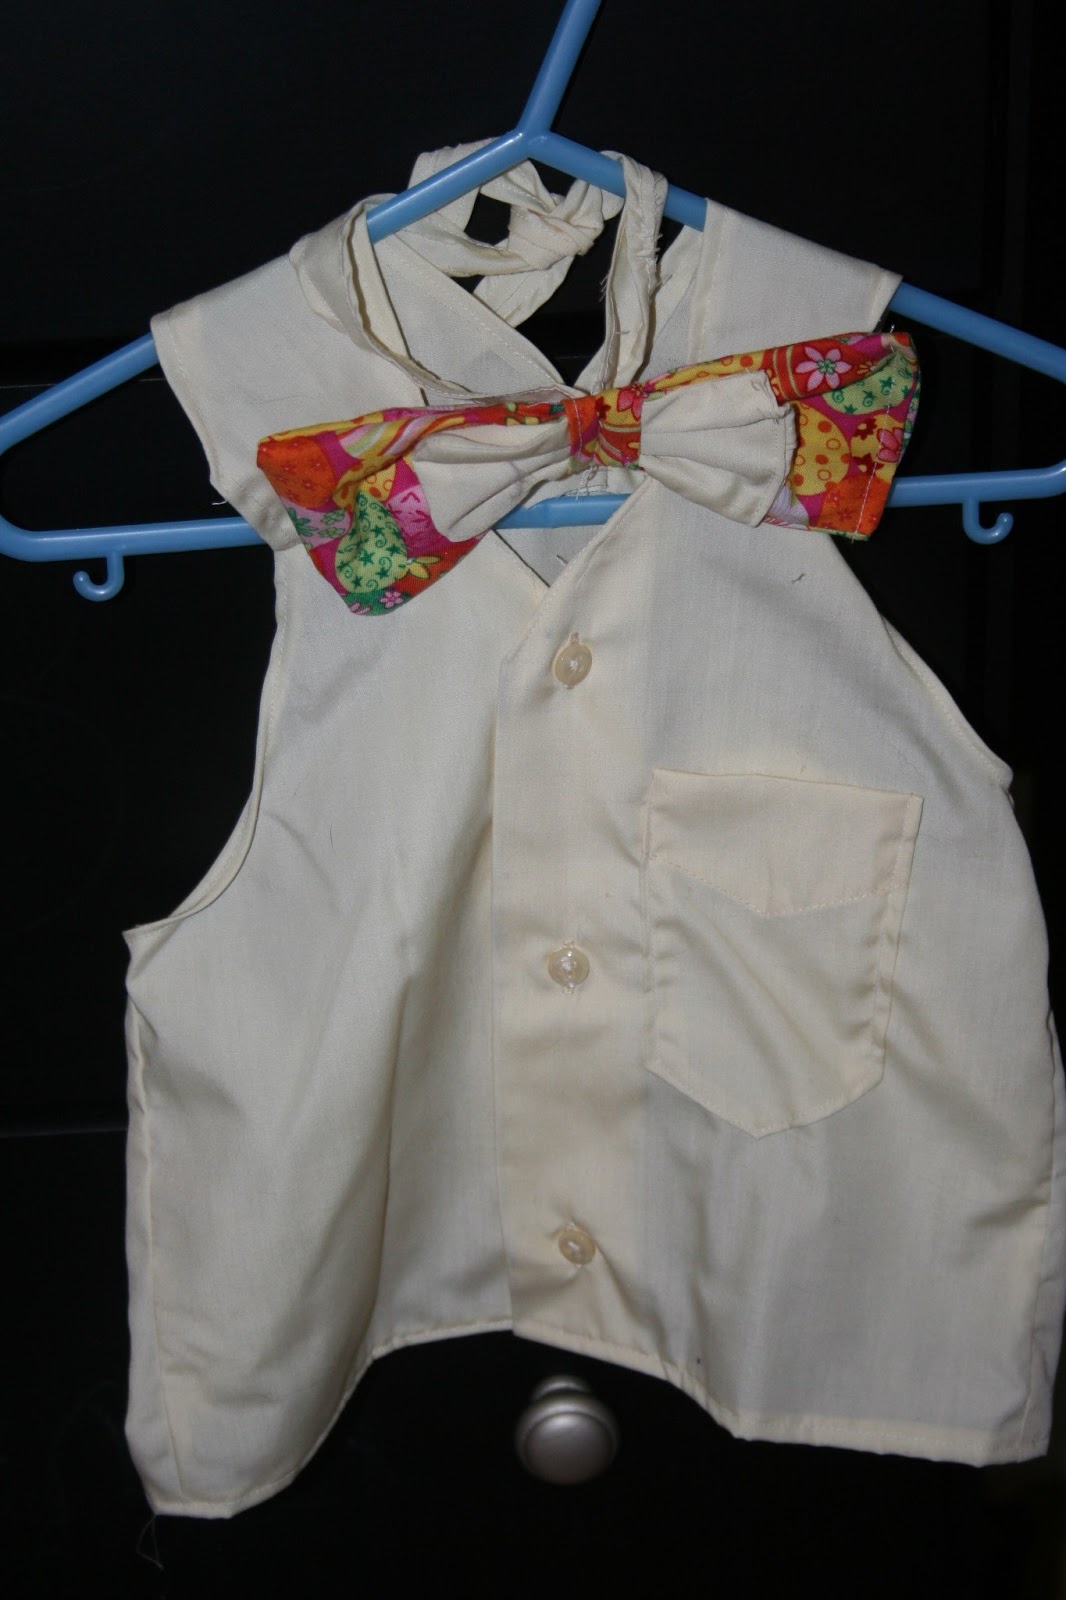
This post is really early or really late ;) I think we all know which one, but I am going to go with early for next Easter in case you want to make one for your kiddos-or maybe you can use it for Christmas?  I took one of Greg's old dress shirts(that don't fit him any more), and got to work on making the kids Easter outfits.  I was able to get a vest for my little man and a dress for my sweet girl! I loved them and think they looked adorable, what do you think? Also, 2 apologies while writing this post-lack of pictures(so very sorry for this one, as it can get hard to explain without pictures), and long post and I'm putting everything into one post(since it is so late) instead of separate posts for each item!
 Double trouble!
Big boy!
Sweet girl!
Flower for Headband Tutorial:
This was the flower that we clipped onto Athaiah's head band!
 
First, cut out 6 circles that are fairly big in size, I used my big cups as a guide. (this is the patterned fabric in the background of the flower).  You will need one more circle that is the same size, you can use a pattern if you like, I just used the plain yellow for this one.  You will also need 6 circles(the pale yellow pictured above) in a smaller size as these ones will go on top of the bigger(patterned ones).
Next, you are going to fold all of these up in half so they are now a semi-circle, and them fold them over again so they make a triangle shape(like above)-I apologize for the lack of during pictures, it makes it hard to follow.  Put a small amount of hot glue on the end to hold them together and keep them folded.
Arrange them on the big circle that you cut out and didn't fold. Put the point sides in the center so that it makes a circle. Hot glue them onto the big circle.  If you would like you can put buttons or any other decoration at the center of the bow! I used buttons off the shirt sleeves since they were small and extra pieces of the shirt, (the pale yellow fabric was fabric from the sleeve of the dress shirt, I was making sure not to waste anything I could use!)
Hot glue the big circle now to an alligator clip so you can clip it on a headband or whatever you like, or so you can just pin it directly to their hair(If your little girl is lucky enough to have hair unlike mine!)

Dress Tutorial:


Take the dress shirt, and line a current dress up with the dress shirt across the bottom and center it. You want to make sure that the dress is centered so you can have the dress button down the front and you want it to button in the middle not on the sides.
With everything lined up correctly-make the skirt part of the dress a little bit bigger so that you can gather it(if you don't want the waste gathered at all just add extra for the seam allowances(1/2" on each side). Then cut out the dress pattern.  I made a separate part for the top and bottom-this was so that I could gather it so it would have more of an A-line shape and so it wasn't so boxy looking.  Just a personal preference.  If you are cutting it into two pieces instead of one just make sure that you add extra to the bottom of the top piece and the top of the bottom piece for seam allowance.  Also make sure the top part will fit perfectly and cut the top part of the bottom piece wider than you want it so you are able to gather the fabric! (I hope that makes sense, I'm sorry I know it would have helped a lot more if I had pictures to help explain things)
Sew up both sides of the bottom piece, and the top piece.  To do that put the right sides of the fabric together and sew up both sides, so the seam will remain on the inside of the dress.  You are going to also sew up the neckline seam.  I use a zig zag stitch because that is what I like and I don't have a serger currently(maybe one day) To sew up the neckline just make sure you tuck about 1/4" under and sew it up so it is nice and smooth.  I used a rounded neckline just because! Just make sure you don't sew it closed! I had to watch out on that part honestly because I almost did!
Last part is to sew the top and bottom pieces together.  IF you made it all one piece congrats you are done-Easy right? Put the right sides of the fabric together and get to pinning, this is to gather it by hand so you don't have to do a gather stitch and then sew it up again.  I like less sewing if possible.  Make sure that you are again keeping the front part where it buttons open(if you like it that way), and sew the two pieces together.  Congrats you are done!  I added a bright pink ribbon to it(not attached, just tied it on) just for a pop of color since it was such a pale yellow shirt! Your done with the girly stuff, now onto what to make if you have a little man! 

The BOW TIE: (My favorite part)
Ok, bow ties are super, super easy-are you ready for it?  You cut out a rectangular shaped piece of fabric(make it double the size you want length wise because you are going to fold it in half).  So if you want a bow tie that is 5" wide and 2/5" tall.  Cut the piece of fabric 11" wide and 3" tall.(the extra is your seam allowance!) Fold it together with the right sides facing.  Sew up 3 of the sides.  Turn it so it is right side out, and sew up the last side.  This bow tie has 2 layers so then do this again, but make it a couple inches shorter! 
For the knot- You are going to cut a piece of fabric 1"x1.5", hem the sides so they don't look rough.  Then sew the two ends together so that is makes a circle! 
For the strap- Cut a piece of fabric a couple inches longer than your child's neck so you can tie it in the back(or if you like you can put a snap on it)  Hem the edges so they look nice and finished.  Attach this to the back of the knot-I hand stitched it on because I had already sewn the knot closed.
Assembly- Stuff the two rectangles into the knot(circle), Adjust the rectangles so they look how you want them to.  I then ran it one time thru the sewing machine to hold it all together.  BUT you don't have to do that part.  My little one is 2 though and can play rough, I just didn't feel like taking a gamble that it would stay all together if he was pulling on it!
 
The Vest:
Take the leftover piece of your shirt.  Make sure this is the top half of the shirt! OR if you are only making a vest you really can use whatever part that you want.  I used a different vest that he already had for the template(makes it easier that way).  Cut out all around the template leaving room for seam allowance.  Sew up both sides by putting the right side of the fabric together and sewing it up!  I then removed the pocket off of the shirt, cut it down to size and placed it on the vest!  For the neckline, just tuck about 1/4" of fabric down and sew it all up so it looks nice and even! Do the same for around the arm holes.  And there you go- A super simple and easy vest! 
 
All of this was made out of 1 dress shirt.  A bonus it was one that no longer fit my husband, which means it was free! The best way to do things!

Tuesday, July 30, 2013

Tie/Bowtie Onesie Revisited

I absolutely loved the tie and bow tie onesies that I made for Elijah.  Problem was that with the red felt and the white onesie it bled a bit when washed.  Not bad or anything...but just enough to notice slight pink color on the onesie.  I also really wanted more, but didn't want to sew them all onto the onesie, although it is by no means hard to do there had to be an easier way!  Well I found it, so here it is! I hope you like it as much as I do because I love it. I found out I'm going to be an aunt for the first time and am thrilled beyond belief.  I wanted to make something special for my new little nephew and these onesies seemed to be the perfect thing!

What you are going to need:
Sewing machine
Snaps
Thread
Fabric of your choosing
Onesies

Take your onesie and near the top of it(neck line), place a snap!  I used the pointed end of the snap on the onesie so that it matched the rest of the front of the snaps on the front of the onesie.  Mainly because I'm just OCD like that(feel free to use whatever end you prefer!) I placed the snap about 1" down from the neckline, and right in the center. (I really shouldn't say I put the snap there because to be honest, my husband is in charge of attaching the snaps!)

Next make all of your bow ties and ties.  This really is easy to do.  I'm going to have to explain it to you as I forgot to take pictures during this part-must be the mommy, post surgery brain I was having while making these! 
To make the tie: I folded a piece of fabric in half, so that you can make it nice looking on both sides.  It was about 4" in length as this was for a 0-3mo onesie so it doesn't need to be too big!  I just took a stencil of the tie, similar to how I did it the first time around,  cutting it out in the shape of a tie-just make sure when you make the stencil that it is about 1" wider than you need it to be so you have 1/2" seam allowance on either side.    Putting the right sides of the fabric together I sewed the whole outside of the tie together, leaving the top unsewn so you can flip the tie right side out.  Iron the tie so it is all straight and neat, then sew the top part of the tie together tucking the top edge like 1/4" under so you have a nice straight edge!  You will then slide the knot part(see below) over the top of the tie and down to the section that goes in bit(where you would normally see a knot on a tie) It is now ready to be attached to the onesie!
To make the knot: Cut out a piece of fabric about 1" wide and 2" long so that you can make the knot part of the tie. This knot part is where I attached the other side of the snap. For this to look nice, I put a seam on both sides about 1/4" wide so that you have nice straight edges that are not going to fray.  Next turn your fabric so the right sides are together and sew it together using 1/4" seam allowance again.  Turn it right side out again and now you should have a circle.  Attach a Snap to the bottom area where the seam now is, as this will go on the bottom side of the tie and attach the tie to the onesie.  You will make one of these for the tie know and for each of the bow ties.  I won't explain this part again, just an fyi-so when I say put the knot on it is this section and the circle that you now have is the knot!

To make the bow tie: Fold your fabric in half so you will have 2 pieces of fabric to sew together.  Cut your fabric so that it is 2.5" wide and 4.5" long.  You are going to use 1/4" seam allowance on all sides.  Put the right sides of the fabric together and sew up 3 of the sides.  Turn the fabric right side out and sew up the last side, tucking 1/4" of the fabric on the inside so you have a nice finished edge. You should have a rectangular shaped piece of fabric.  Now you just slide your knot over the fabric and place it in the middle, it should pull the fabric together so it looks like a bow tie.

Simple! Quick! Easy! Amazing!  Maybe I'm just partial but I love that you can now interchange the ties and bow ties to create whatever look you want and you don't have to use as many onesies.  I made baby Oliver a red, blue, grey, and camo bow tie! Red and blue since those are mommy and daddy's school colors, grey because well it was a dressy fabric, and camo because his daddy likes to hunt.  I also made a camo tie just for kicks and giggles!

Wednesday, August 22, 2012

Jersey knit skirt/yoga style

First you are going to need some measurements.
Measurement A-the width of persons waist minus 2 inches
Measurement B-how long you want it to be(I did mine knee length) (plus 1" for seam allowance)

*When using knit fabric you want to make sure you are always using the side that stretches as your width, so it can stretch up over your hips(if you have wide hips like me).
I don't have any pictures of the process on this one, I apologize, I will look for a tutorial elsewhere to see if I can link it up so if you have questions you can refer to something(I know I'm a visual learner and have to see it in order to do it) http://sewmamasew.com/blog2/2010/06/yoga-skirt-tutorial-tips-on-using-knits/  She explains it really well here and has lots of pictures!

First, we are going to cut out the waistband, so the stretchy side of the fabric needs to equal your measurement A with 1/2" seam allowance.  The length of the fabric will be 7 inches, giving you ample room to fold over the top yoga style. I cut mine in one big strip so that I would only have to sew up one side(it's faster that way)  Now you are going to sew it up so that it makes a waistband! So sew the short sides together using 1/2" seam allowance.  On knit fabric make sure your tension is a bit looser than normal.  I had mine on 2, and with most cotton I use 1!
Now you are going to fold it in half yoga style, so it should be about 3.5" tall, fold it so that your side seam is now on the inside.

Onto the main part of the skirt.  Cut this the full width of the fabric(stretchy side), this will let it be gathered and give it some fullness so it doesn't stick to you.  Of course you don't have to cut it that big if you are making it for a baby, just measure their hips and add like 5" so you can gather it some to make it flow nice! Then you are going to use your measurement B to cut in the length that you want it(not on the stretchy side).

Sew the side seams together using 1/2" seams.  Next you are going to hem up the bottom of the skirt.  I used about 1/2" seam allowance.  You can either sew this using a serger if you have one.  I currently don't so I used a zig zag stitch with my tension at a 2 to sew this up. I actually love the way it came out.  It isn't too noticeable, but it adds kind of a fun homemade flair!

Now if you want to gather the top so that is is kind of flowy(is that a word?), you can go across the top of the skirt and gather it by pinning it to the waste band and gathering it a bit as you go, or you can use a gather stitch, click here for link on how to do this.  Once your fabric is gather(I used the sewing method, I never can manually gather very evenly), pin the waistband to the top of the fabric.  This gets tricky to explain-pin it so that the bottom of the waistband is at the top of the skirt, but in order to do this so no seams show, you have to slide the whole waistband over the skirt with that bottom part facing up.(I hope that makes sense, if it doesn't you can always message me and I will try and explain it better).  Make sure your fabric is gathered so that it will fit around your hips, then as you sew stretch the waistband so that it will go over your hips.  If you make the skirt to match the waistband and you have wide hips the stitches will most likely rip:(  Sew this up using a loose stitch(2 still for me).  Now turn it all right side out and you have a skirt.  The last thing I did was I took out the gather stitches, a bit time consuming, but well worth it because then the skirt will stretch better when you go to put it on.(I would recommend spending the time on this one).  Then when you put it on you can fold the top part down.  This is such a wonderful skirt.  I made one for myself and one for my new little girl and we wore them in May to the wedding(I know took me long enough to post huh??)
At the Rehearsal dinner in her new skirt!
 
At the wedding in my skirt!

I wore this skirt after my C-Section because it felt so comfy and didn't rub on my scar! Also would make a good maternity skirt as it can stretch with you, or just a skirt for comforts sake(always a must for me)

Wednesday, August 8, 2012

Fix 'em up

Today I finally got to my mending pile!

I had Elijah's duck wing to sew up. One of his favorite stuffed animals from his Great Grandma and Grandpa Luurtsema.
 Much better now!
Greg had two pairs of shorts that needed buttons sewn back on.
All done!
And last Greg had a pair of pj pants that ripped on the seam, so that needed to be fixed.
Check!
Looks like it was a great day and it was so good to get all of these checked off my to do list!

Wednesday, April 18, 2012

Dog Bed

I made this quite a while ago, but now that I know how much he liked it I decided to post it.
Our dog and our two cats used to all sleep in our bed.  Can you say a little too crowded?  We now shut the door at night to keep the cats out, but our dog cried all night long and caused us not to sleep so we let him sleep in the room.  We just needed to figure out a way to keep him off the bed.
Let me preface this by saying he had a dog bed when we first got him, and he was so scared all the time he was constantly peeing on it, so I threw it out figuring it was doing more harm than good in the long run.  With that said I didn't want to go and spend another $20 on a dog bed. (we have to get the big kind since we have a chocolate lab).
As I was making the bed one day I noticed how torn up our mattress pad was getting so I came up with this idea!

I cut all the elastic off the sides of the mattress cover and snipped all the corners so that it would lay flat.  I then found a fleece blanket of mine that I used in high school on my twin bed-which doesn't fit our queen now I just never threw it away because it was soo comfy and it was purple my favorite color.
I then folded the mattress pad so that it was 1/4 of the size(this because my stuffing for the dog bed).  Then I folded the fleece blanket in half around the mattress pad, tucking in all the edges so the seams were nice and neat.  Sew all this together(I had to sew slow as it was really thick).

Guess what you are done.  My dog sleeps on this every night! I never thought we would be able to get him out of the bed.  I think it helped that it had our smell on it from being an older blanket.  Now when we go downstairs he goes straight for his bed, and it hardly took any training at all! (by training I mean that it took us two days of telling him to get off the bed, and when he got off the bed he went straight for his new dog bed).  Made me feel like doggy mom of the year, that is since he likes it so much!

Friday, March 30, 2012

Chair Cover

With everything getting moved around and being in a new place, my one cat gets finicky.  Needless to say how she usually repays us is by peeing on something.  So of course she picked my Ikea chair to pee on because we have one no where near us to be able to get a replacement cover at.
We decided to make one since we just finished the basement.  I really wanted some red down there, but not too much.  A chair cover was the perfect place to add some pops of red!

We found these super soft sheets on sale at Walmart and since a couple things needed recovering you will probably see this same design pop up in a lot of places.  But I like things to match so I have no problem with that!
I am not going to give you measurements because if you decide to recover something yourself it will probably be a different size.  This will just give you the basics on how to do it.
Part 1: Measure the top part (where your head rest).  Cut the fabric to that size(adding some for seam allowance).  I then had some old batting I put in there to make it fluffy since this is the head rest of the chair. Sew all this up making sure to sew the batting into the seams so that it stays and doesn't move around when you wash it.  Also make sure the right sides of the fabric are together and the batting is on one of the back sides.  I then place batting side down on the sewing machine so the needle doesn't get stuck in it.  I have some batting spray so I sprayed this on the fabric to make sure it sticks(it is like a glue for fabric and batting). Set this piece aside.

Part 2. I measured the second part of my cover, and cut that about 3 inches longer than needed.  I did these because I needed some room for seam allowance and also to sew the other two pieces to this one piece.  I then followed the same steps as above.  I placed the batting on one of the wrong sides and put the fabric right sides together.  Make sure you don't sew it all the way around so you have room to pull all the fabric through.  I left the whole bottom open as I was not quite sure how I was going to attach it to the other pieces yet, and needed to come up with a way to put the foam back into the chair.  I didn't really want to do a zipper not that it's hard I just didn't want to have to go and buy one, too cheap for that! 

Part 3: Same as the last 2 parts.  Measure and add room for seam allowance and some extra so you can attach it to the middle piece.  I added 2 inches to this one from the original measurement.

Part 4: Now we are going to attach all these pieces together and close up all those last seams.  I was still deciding how I wanted to do this in the process because I wanted to make sure I could remove the cover if it needed washing and then I wouldn't have to wash the foam pieces that go inside of it.

I attached them with some the top side of the fabrics sewn together-the parts that would be touching once on the chair.  I sewed this with about a 1 inch seam and I sewed about 1/4 of an inch in on either side just to make it lay flat and look nice.

Now all that is left is the back side of the chair cover which is left open.  I decided to put some snaps on this side so I can easily remove the cover if it needs washing.  So I attached three snaps-they are the hammer in kind and they work great! Last we stuff the foam back into the chair, and snap it closed and you are done!

It looks really nice and really adds a nice touch to the basement. The cat likes it:)

Wednesday, March 14, 2012

Pacifier Carrier

I cut a piece of fabric 5"x10.5 " I measured this along the fold of the fabric, so the actual size would be twice this length.  I then folded it so that right sides were together.  Sew this up, but leave one of the short sides open so you can pull the fabric through so it is the right way!
Let's make the strap now before we sew up the next part of the bag! To do this cut a strip a fabric that is 2"x7" fold it in half(with right sides together) so it is 1"x7", sew up one short side and the long side.  Now push this so that it is right side out, and you have a strap.  I cut this in half and used half for the diaper bag strap and one for the paci strap.

Now fold that piece in half, and tuck in the strap that you made so you can attach it to another bag (in my case to the small diaper bag). Make sure you put this strap in one of the top corners that you are going to sew up! Sew up the two side seams.  This will tuck in your rough end that you left.

 I made it big enough to fit a soothie since those seem to be the biggest pacifiers!
Now you attach the snap to the bag.  I bought the kind that you hammer in and they seem to work really well and it doesn't take much time to do. I also attached one half of the snap to the paci holder and the other side of the snap to the diaper bag, so they can be easily moved together!

 Matching pacifier holders!
Everything matches! Makes me a happy momma!

Tuesday, March 13, 2012

Diaper bag-small

With another baby on the way, I decided to make a small diaper bag-big enough to hold a few diapers and wipes.  That way I can put both of the bags in one big diaper bag and I don't have to carry around two big bags.  Especially since they will be in different classrooms but Eli won't need much more than diapers and wipes, and the baby will need more stuff.

Here is the pattern:
First cut the fabric so that it measures 10" x 22". This was cut along the natural fold in the fabric so it is actually twice this size (just a side note).


Now fold it so the right sides are together and sew up the sides.  Remember to leave an opening so that you can pull the fabric right side out.  I left like a 3" hole so it was a bit easier to turn it the right way.

Iron so that it lays flat. You don't want any air in it or it won't fit in a small space, which is what we want.
Tuck in the raw edges that are left on the one side(you don't need to sew them up).  We are going to make a small strap to attach to the bag, so it can be attached to something such as the pacifier carrier.

To make the strap:
Cut fabric 7" long by 2" wide.  Fold in half right sides together and sew up the sides, leave one of the short sides open so you can pull the fabric right side out through this hole.  You may need to use a long stick, I used a knitting needle to help push the fabric through the hole.  Now you are going to cut this in half, so you have a piece that's 3" long. Now you have two to use, we will use the other one in a different tutorial.


Back to the main bag:
Now you are going to fold it in half again so that it makes a rectangle.  Place on of the staps on a top corner of the bag, lay it on the inside so it will end up on the outside of the bag.

Sew up the two side seam, your raw edge should be in these side seams. Turn right side out, and guess what you're almost done.

I then put a snap on the top middle of the bag (I bought the kind you hammer into place, really quick and easy to use and not too expensive).  I then put half of one snap on the middle of the strap.(I put the other one on the pacifier carrier strap so I can attach them together.) It turned out quite nice!

 Diaper bags with matching pacifier carriers, one for Eli and one for the baby girl!

Sunday, March 4, 2012

Quilted skirt-Adult

Fabric Strips: 3"x21"
Bottom wide piece:11.5"x(1.5x your waist measurement)
Bottom Skinny Piece: 3"x(1.5x your waist measurement)
Waistband" 2"x(how ever big your waist is)
Elastic: I used 1/2" and then 2" less than my waist measurement.

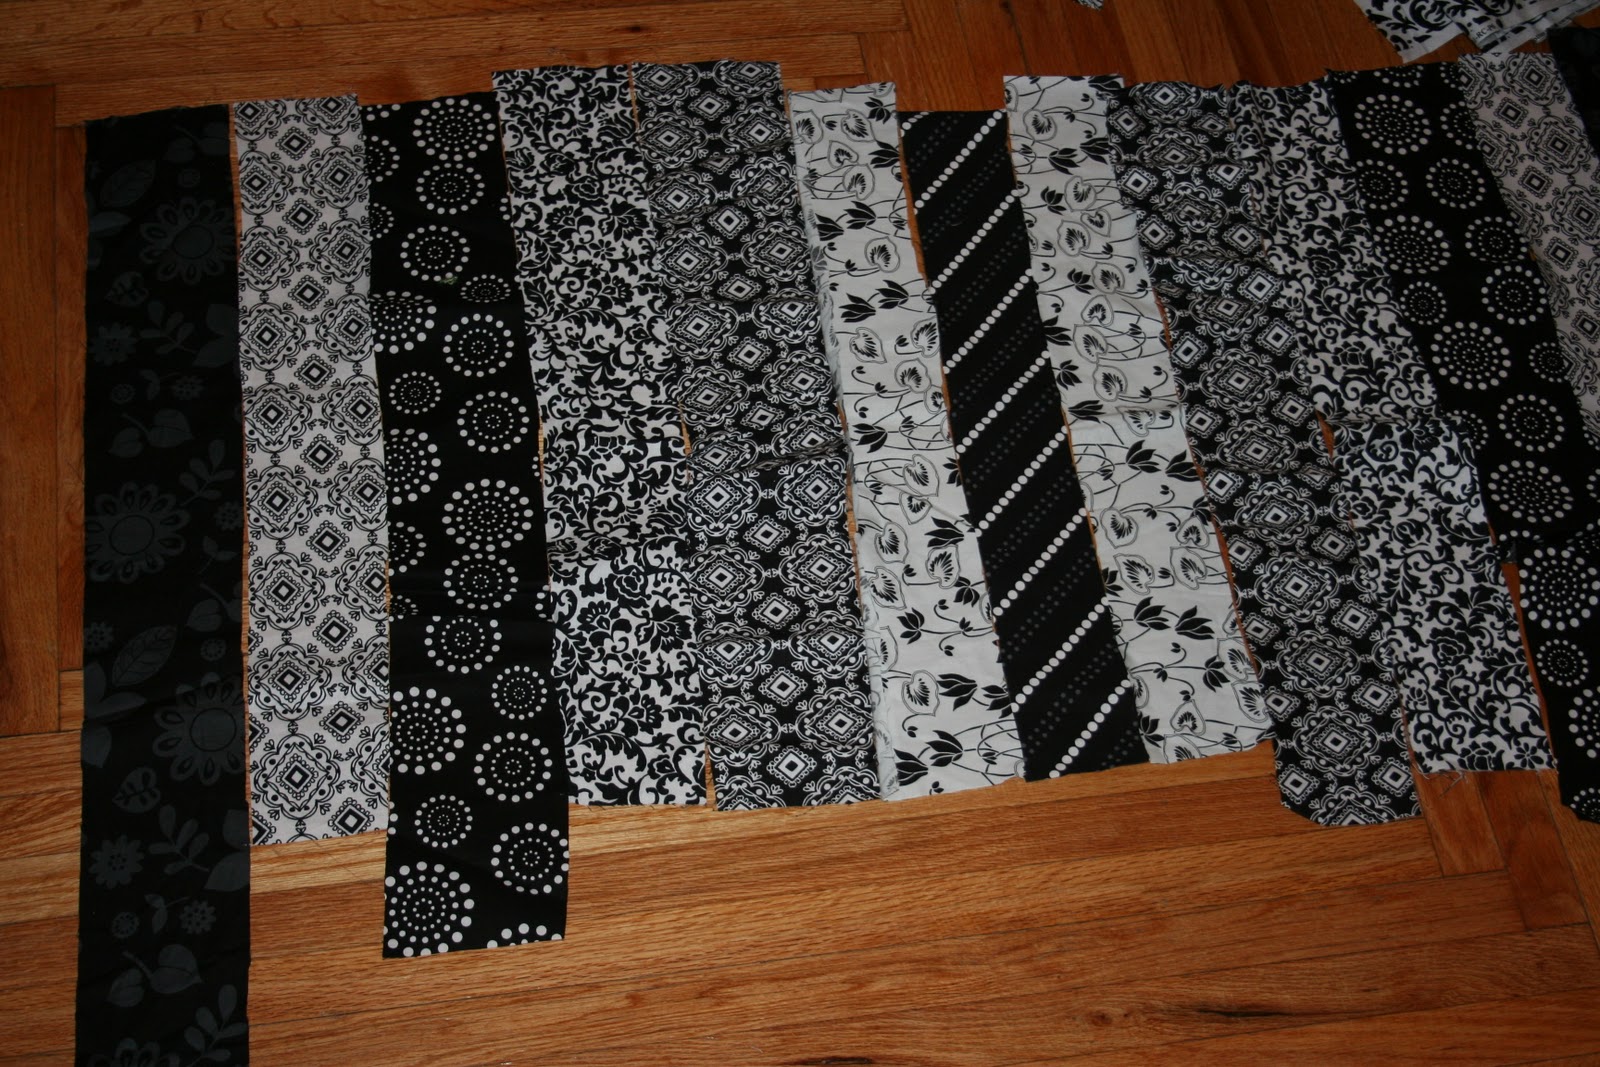
I decided to make this skirt because I had a lot of leftover black and white fabric but not enough of any of it to make a skirt for myself.  Soo I decided I would give it a quilted look and piece them all together.

To start out I cut out all my strips of fabric. I needed 15 strips.
I had a very good helper!

Next, I placed them all out to make sure that they looked evenly spaced with not too much black background in a row. I know they are not all the same length. I cut them all even later(I just started with the length that I had of each fabric to see how long I could get it)

Now you set to work on sewing all these strips together. I used 1/4" seam allowance on these.


 So now you should have what looks like a block of fabric. Make sure it will be wide enough to fit all the way around you! I trimmed the edges all even after I had all the pieces attached.

I then took the pieces I had cut out for the bottom pieces of the skirt and I gathered them at the top click here if you need directions on how to do this.  I then sewed both of these pieces together to make the full bottom.

Take your bottom piece and sew it to your block of fabric scraps, make sure you do this with the right sides together so that you get a nice clean seam.  Also sew it right above the gathered stitch so that the messiness of it is covered.


Now for the waistband.  Take your elastic and put it in your waistband.  I did this by adding it before I put the waistband on the skirt.  Make sure the elastic is 2" shorter than the fabric so that it will hold it better. 
To insert the elastic waistband, fold the top part of the skirt over, and tuck in the bottom so you have a nice clean edge. Now sew up the side.  Make sure you pull on the elastic as you go, so that it will bounce back into place when it is finished. (I forgot to take pictures of this step I'm so sorry and this is a complicated piece to explain)

Once your waistband is made, attach it to the rest of the skirt.  Make sure when you attach it the elastic is at the top and that you sew it with right sides together, this just always keeps everything looking neat and tidy!Turn the fabric so it is right sides together and sew up the side seams.  This will make it a circle.  You are done. Enjoy!

Saturday, February 18, 2012

Ruffle bottom skirt pattern

First cut out a piece of fabric that is 18"x8".

The first thing I did on this one was to put in the elastic waistband and it worked so much better than putting it in last.
To do this you are going to make a "pocket" for the elastic to go into.-this means I folded the top part of the fabric 1/4" down and ironed it flat(this was so there were no rough edges in the skirt). Next, Fold 1/2" of the fabric over and iron it so it lays flat. Now you are going to put the elastic in the 1/2" fold that you ironed.  The elastic should be 1-2" shorter than the width of your skirt so that it will stretch.  Sew this up, while pulling on the elastic while you are sewing. Now your waistband is done!

Next cut out a strip of fabric that is 1.5xs the width of the skirt and 2" wide.   First hem the bottom part I used a 1/4" seam for this.  You are going to do a gather on the top of this so that it ruffles.  If you want to check out how to do that follow the link here and it will show you.

Now attach the ruffle piece of fabric to the bottom of the skirt.  Pin it so that it stays and you can then make sure you don't need to adjust the ruffle lengths anywhere. (Make sure the right sides of the fabric are together so you won't see any rough edges).  I used a 1/2" seam make sure that the top part where you gathered will be hidden once you turn it the right way.

Now that your bottom is attached to the skirt, sew up your side seam so that it makes a circle and you are done!

Easy and cute right??