Thursday, September 19, 2013

No Bake Cookies

Ingredients:
1 3/4 c sugar
1/2 c milk
1/2 c butter(1 stick)
4 TBSP unsweetened cocoa powder
1/2 c crunch peanut butter
3 c quick cooking oats
1 tsp vanilla


Monday, September 16, 2013

Seasoned with salt

As Christians, is our conversation seasoned with salt?  I have been hit really hard with this question lately. Is my conversation seasoned with salt and full of grace?

Colossians 4:6 "Let your conversation be always full of grace, seasoned with salt, so that you may know how to answer everyone." (NIV)

According to the Bible it should be!  As a cook, this verse hits home.  Salt can add something to the food in a significant way.  I was once told by a dear friend, if you think your food tastes like it is missing something-add some salt. I have found this to be true.  Is our conversation missing grace? Grace is the salt to our conversations, we need to make sure it is in all of our conversations.
I have seen so many young children committing suicide because people are bullying them.  Are we teaching our children how to be full of grace, and their speech to be seasoned with salt?  Are we teaching them to help those in need? Are we teaching them to "be kind to one another?"  I hope that we are, I really do.  I hate to see all these young lives gone because no one stood by them, and they felt they were all alone in this world.  We need to make sure we are reaching the lost.

Ephesians 4:32 "Be kind and compassionate to one another, forgiving each other, just as in Christ God forgave you."

I am reminded in my daily life, with my children, that I need to let my conversation be full of grace.  Because Jesus offered me grace and mercy, I should also do the same for them.  After all, children learn best when they see something in action.  They do not do just as we say(in fact we could turn blue telling them something), but will most often follow our lead.  We need to step up and lead them in the correct direction. Are we teaching them how to speak? Are we teaching them how to answer another without offense?  Are we teaching them what it means to be kind, and compassionate? Do they know what true forgiveness is?

Speech is something that can cut straight to some one's heart.  We need to think about what we are going to say before it is said, so that is may be seasoned with salt.  We need to show the love of Christ not just in our actions, but also in our speech. When we stop and think we are letting our speech be seasoned, we are thinking about how to answer according to God's Word.  When we think, we are doing just as God commanded. Is it full of love and compassion?

I don't just see bullying when it involves young children.  Goodness, I see it so much in the mommy circle it isn't even funny.  AND we are GROWN adult women caring for children.  We should be raising them up according to HIS Word!  They should not see us bickering with other moms because they don't breastfeed, or don't use cloth diapers.  OR just maybe they have to work and don't have the blessing and the gift of being able to stay home with their children(because it is truly a gift and a blessing from God to be able to stay home with your children, no matter their age).   Let us please remember we are each called to something different as a mom.  Each of our circumstances is different. 

When we speak to each other we need to make sure it is FULL of grace, because let's face it what mother doesn't need a huge helping of grace each and every day?  Which person doesn't need a FULL helping of grace when we are speaking with them?  We don't know their circumstances, we don't know what they have or don't have.  They could be falling apart on the inside.
Please I beg of you, let your conversations be full of grace, seasoned with salt, so that you may know how to answer everyone!  Let God's Word shine forth in your life.  Be the light for the lost, and stand up for those in need, and even those who may not "appear" to be in need. We all need the Lord and we all need grace. DAILY!

Dear Father,
I pray that you will let my speech be full of grace, and seasoned with salt.  Help me to please think before speaking so that I may know how to answer everyone.  Help me to encourage those around me, and to help those in need.  To be kind and compassionate. I thank you Lord for giving me the strength to do all things through your power.  I also thank you for showing me grace and mercy on a daily basis.  I would not be where I am today without your grace.  Please help me to show others the same grace you have shown me, so they may in turn be pointed in your direction.  Make me a light to the world.
Amen

Saturday, September 7, 2013

Featured...

A recipe of mine was posted on a friends blog...Go check the recipe out, I'm telling you it is amazing!  It is for my Berry Streusel Muffin.

Thanks Cherise for sharing my recipe!

Here is a sneak peak at what they look like! Click on the link above to see the recipe!

Thursday, September 5, 2013

Pillow Case Dress- 12months

Pillow Case Dress:
I love these because they are super simple and they are quick!  I made one for Athaiah to wear to a bridal shower to go with my maxi dress!  It was a lot of fun and I will definitely be making more.  You do not necessarily have to use a pillow case you can obviously just use some fabric, but I found the pillowcases on sale and loved the cute little pattern!
 
What you will need:
Pillowcase(or fabric if you are going that route)
Ribbon-cut 2 equal pieces twice the length of her neck-or greater for a bigger bow
A dress of current size(for measurement purposes)
 
First step:  Cut out your dress.  To do this I placed a dress that currently fit her on top of the pillowcase.  Fold the pillow case in half width ways, that way you just measure half the dress and you won't have as many seams to sew up! Easier is always better in my book!  Make sure you add 1/2" all the way around for seam allowance.
 Second Step:  Cut it out! Easy enough, right?!
 Third Step: Sew up the sides with the right sides of the fabric together. But do not sew the part where the arms would be or the top part(along the neckline)  When you get to the arm holes, sew up each side(top and bottom) separately, this will make a nice seam ensuring you don't have any rough edges. But will keep the arms open so it is easy to slip on and makes the ribbons the top of the "arm hole."
 Fourth Step:  Cut out a piece of ribbon for the neck line.  I did one piece for the back and one for the front so it can tie together at the sleeves.  You can use any size of ribbon you like. I did super skinny ribbon because Athaiah has super, super petite shoulders and I thought a big ribbon might be overwhelming on her little arms.
Fifth Step: Fold the top piece of the fabric down 1/4"(I recommend ironing so it stays nice and straight). This is so there is no fraying fabric.  Fold the fabric down again the width of your ribbon(mine was another 1/4").  Lay your ribbon inside the flap(This eliminates having to string it thru later, but if you prefer that method by all means go ahead, I just like to cut out as many steps as possible) See picture below!

Sixth Step: Now sew along the bottom, ensure the ribbon is tucked inside, but don't sew the ribbon.  You need the ribbon to be able to move some! Center your ribbon in the sleeve with extra on either side, sew a line down the center(top-bottom) this will hold the ribbon inside the sleeve but still enable you to gather it at the sleeve so it can fit your sweet little one!
Do this again with the back piece!
 No need to hem the bottom if you used the bottom of the pillowcase.  I made sure that I did to eliminate another step of sewing, keep it simple.  That is the point of these dresses to be extremely simple!!


Wednesday, September 4, 2013

My life these days...

My life these days are filled with...

Smiles, giggles, and belly laughs..

Crying, because of a scraped knee...

Kisses to make every thing all better...

Diapers and a lot of them...

Sand filled hair and shoes, from our time outside...

Little shoes lined by the front door...

Reading books and Bible stories

Dancing around the house...

A mountain of laundry...

A pile of dishes...

Warm little fingers grasping for my hand...

Coloring pages and warm comforting gazes...

Cars strewn all over the floor...

Blocks being built into garages and towers...

Play dough all over the kitchen table...

Snuggle time with each of my babies...

Being silly and making faces...

Jar lids becoming bracelets...

Children playing make believe...

Late nights and even earlier mornings...

Prayer and a lot of it...

Wishing that time would slow, so I can sit and enjoy more of the little moments like these! Life may be crazy at times, but I wouldn't trade it for the world.


Tuesday, August 27, 2013

Easter outfits-tutorial

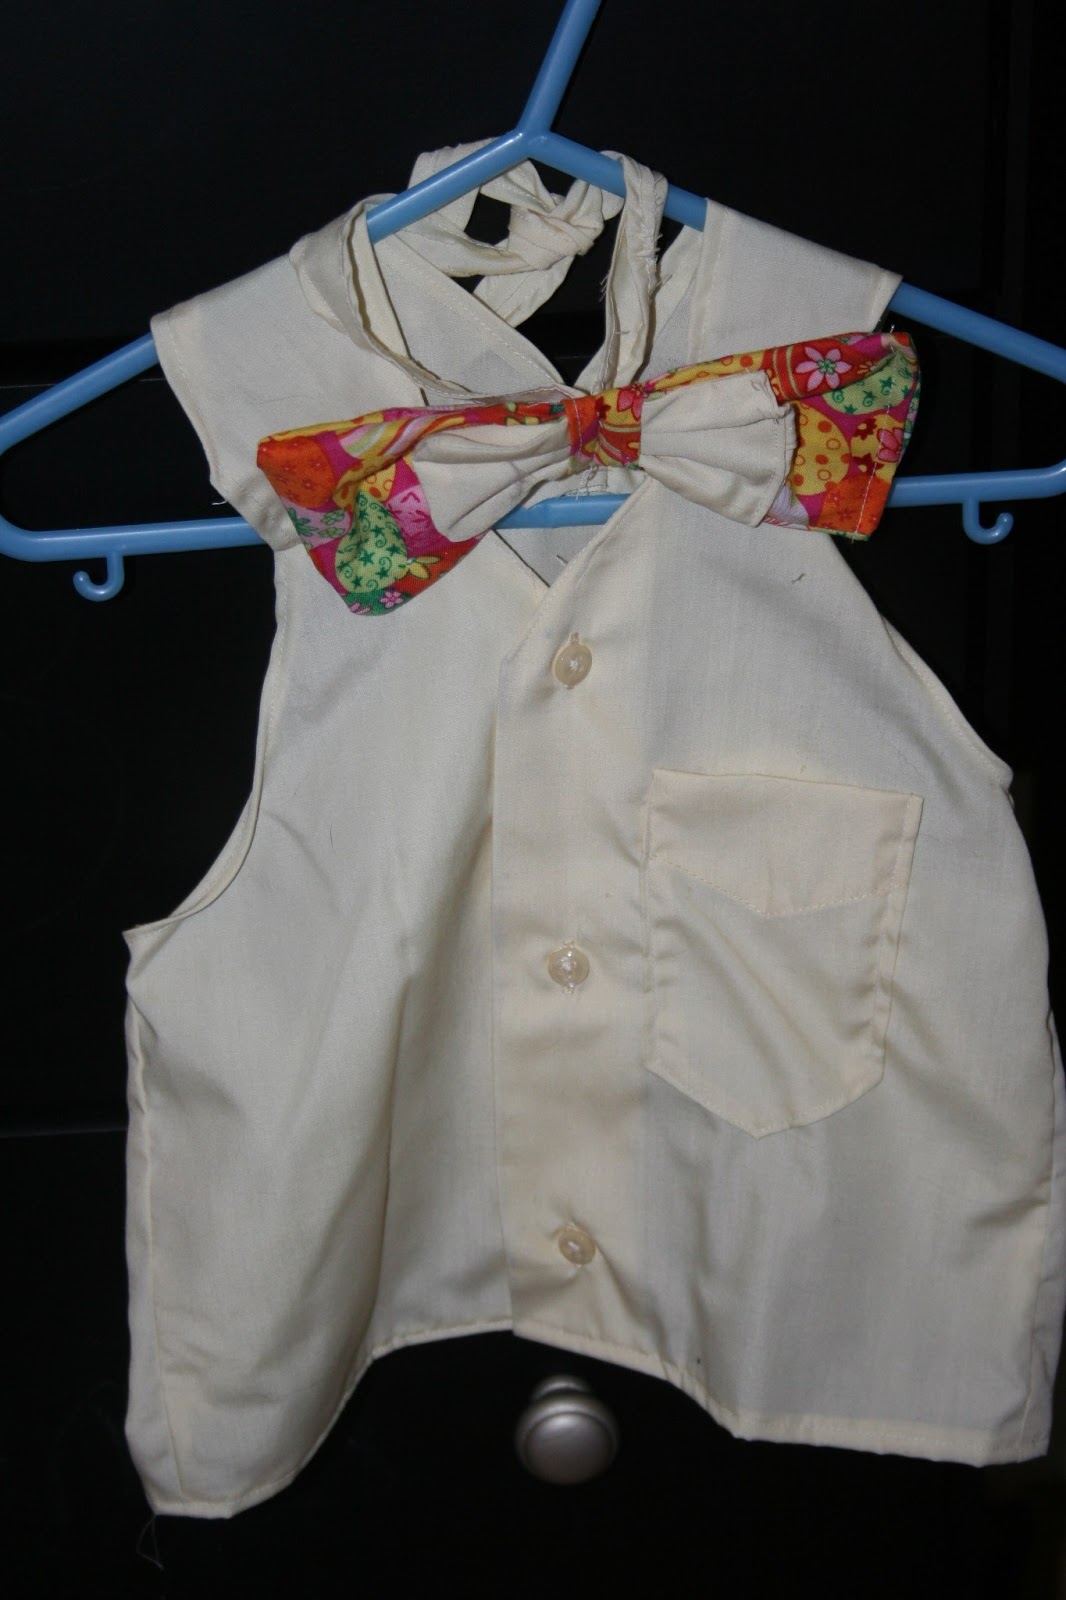
This post is really early or really late ;) I think we all know which one, but I am going to go with early for next Easter in case you want to make one for your kiddos-or maybe you can use it for Christmas?  I took one of Greg's old dress shirts(that don't fit him any more), and got to work on making the kids Easter outfits.  I was able to get a vest for my little man and a dress for my sweet girl! I loved them and think they looked adorable, what do you think? Also, 2 apologies while writing this post-lack of pictures(so very sorry for this one, as it can get hard to explain without pictures), and long post and I'm putting everything into one post(since it is so late) instead of separate posts for each item!
 Double trouble!
Big boy!
Sweet girl!
Flower for Headband Tutorial:
This was the flower that we clipped onto Athaiah's head band!
 
First, cut out 6 circles that are fairly big in size, I used my big cups as a guide. (this is the patterned fabric in the background of the flower).  You will need one more circle that is the same size, you can use a pattern if you like, I just used the plain yellow for this one.  You will also need 6 circles(the pale yellow pictured above) in a smaller size as these ones will go on top of the bigger(patterned ones).
Next, you are going to fold all of these up in half so they are now a semi-circle, and them fold them over again so they make a triangle shape(like above)-I apologize for the lack of during pictures, it makes it hard to follow.  Put a small amount of hot glue on the end to hold them together and keep them folded.
Arrange them on the big circle that you cut out and didn't fold. Put the point sides in the center so that it makes a circle. Hot glue them onto the big circle.  If you would like you can put buttons or any other decoration at the center of the bow! I used buttons off the shirt sleeves since they were small and extra pieces of the shirt, (the pale yellow fabric was fabric from the sleeve of the dress shirt, I was making sure not to waste anything I could use!)
Hot glue the big circle now to an alligator clip so you can clip it on a headband or whatever you like, or so you can just pin it directly to their hair(If your little girl is lucky enough to have hair unlike mine!)

Dress Tutorial:


Take the dress shirt, and line a current dress up with the dress shirt across the bottom and center it. You want to make sure that the dress is centered so you can have the dress button down the front and you want it to button in the middle not on the sides.
With everything lined up correctly-make the skirt part of the dress a little bit bigger so that you can gather it(if you don't want the waste gathered at all just add extra for the seam allowances(1/2" on each side). Then cut out the dress pattern.  I made a separate part for the top and bottom-this was so that I could gather it so it would have more of an A-line shape and so it wasn't so boxy looking.  Just a personal preference.  If you are cutting it into two pieces instead of one just make sure that you add extra to the bottom of the top piece and the top of the bottom piece for seam allowance.  Also make sure the top part will fit perfectly and cut the top part of the bottom piece wider than you want it so you are able to gather the fabric! (I hope that makes sense, I'm sorry I know it would have helped a lot more if I had pictures to help explain things)
Sew up both sides of the bottom piece, and the top piece.  To do that put the right sides of the fabric together and sew up both sides, so the seam will remain on the inside of the dress.  You are going to also sew up the neckline seam.  I use a zig zag stitch because that is what I like and I don't have a serger currently(maybe one day) To sew up the neckline just make sure you tuck about 1/4" under and sew it up so it is nice and smooth.  I used a rounded neckline just because! Just make sure you don't sew it closed! I had to watch out on that part honestly because I almost did!
Last part is to sew the top and bottom pieces together.  IF you made it all one piece congrats you are done-Easy right? Put the right sides of the fabric together and get to pinning, this is to gather it by hand so you don't have to do a gather stitch and then sew it up again.  I like less sewing if possible.  Make sure that you are again keeping the front part where it buttons open(if you like it that way), and sew the two pieces together.  Congrats you are done!  I added a bright pink ribbon to it(not attached, just tied it on) just for a pop of color since it was such a pale yellow shirt! Your done with the girly stuff, now onto what to make if you have a little man! 

The BOW TIE: (My favorite part)
Ok, bow ties are super, super easy-are you ready for it?  You cut out a rectangular shaped piece of fabric(make it double the size you want length wise because you are going to fold it in half).  So if you want a bow tie that is 5" wide and 2/5" tall.  Cut the piece of fabric 11" wide and 3" tall.(the extra is your seam allowance!) Fold it together with the right sides facing.  Sew up 3 of the sides.  Turn it so it is right side out, and sew up the last side.  This bow tie has 2 layers so then do this again, but make it a couple inches shorter! 
For the knot- You are going to cut a piece of fabric 1"x1.5", hem the sides so they don't look rough.  Then sew the two ends together so that is makes a circle! 
For the strap- Cut a piece of fabric a couple inches longer than your child's neck so you can tie it in the back(or if you like you can put a snap on it)  Hem the edges so they look nice and finished.  Attach this to the back of the knot-I hand stitched it on because I had already sewn the knot closed.
Assembly- Stuff the two rectangles into the knot(circle), Adjust the rectangles so they look how you want them to.  I then ran it one time thru the sewing machine to hold it all together.  BUT you don't have to do that part.  My little one is 2 though and can play rough, I just didn't feel like taking a gamble that it would stay all together if he was pulling on it!
 
The Vest:
Take the leftover piece of your shirt.  Make sure this is the top half of the shirt! OR if you are only making a vest you really can use whatever part that you want.  I used a different vest that he already had for the template(makes it easier that way).  Cut out all around the template leaving room for seam allowance.  Sew up both sides by putting the right side of the fabric together and sewing it up!  I then removed the pocket off of the shirt, cut it down to size and placed it on the vest!  For the neckline, just tuck about 1/4" of fabric down and sew it all up so it looks nice and even! Do the same for around the arm holes.  And there you go- A super simple and easy vest! 
 
All of this was made out of 1 dress shirt.  A bonus it was one that no longer fit my husband, which means it was free! The best way to do things!

Wednesday, August 21, 2013

Grandma Kiki visits...

Ok so I will start off by saying this is old, but life is crazy busy with 3 kids 2 and under and getting back into the swing of things.  How on earth do people keep up?  I have a mountain of laundry, another of dishes, a messy floor, and a gross bathroom. (when I'm done with this I am off to tackle the lingering housework).  Any way enough excuses and onto our fun time!

Grandma Kiki(my mom) came to visit us right before I had to go back to work.  It was a short visit(don't they always seem way too short!), but fun was had by everyone.  She got here on Thursday and we all took the trip to go and get her.  The kids where so excited the whole way talking about seeing her and getting oh so very excited. Hard to contain yourself from the excitement when you have to drive a whole hour to the airport! Pretty much when we got home we went to bed since it was already getting late.

The next day we lounged around in our pjs, I think for most of the day.  This was great! I love to not NEED to go any where or do anything.  We just hung out with each other and with the kids.  She brought presents for everyone, which was not needed but much appreciated!  She got the kids a memory game and then she taught Elijah how to play. We just played it the matching way with all the cards face up-he LOVED it.  He still loves to play HIS game. He loves having his own game and not one that is for mommy or daddy to play!  We all went out to dinner that night at applebees.  Thank goodness there was an extra pair of hands.  Off to walmart we went after that to get Elijah stuff to potty train.  He had decided the day she was arriving that he wanted to use the potty.  Grandma had fun buying him some big boy underwear and some special treats(Reese's pieces) for when he went potty.  It was a huge help to have her there to help us start the process and get all excited with us.  Elijah loved the extra praise and was loving going to the bathroom!
Saturday we hung out for a bit in our jammies and then it was time to take Grandma back to the airport.  Elijah said he wanted to go on the airplane too! It was sweet.  We had such an amazing visit.  We absolutely love when family can make it all the way out to the boonies to come and visit us! Hopefully we will get some more visitors some time soon!