Wednesday, February 29, 2012

Zig Zag Afghan

Yarn in whatever kind you like,  I used:
A -Med Blue fuzzy yarn
B-White Angel hair
C-Purple Homespun knit with Purple Fun Fur
D-Grey Angel Hair
E-Blue Homespun
Size 8 circle needles
Sewing needle meant for yarn(so you can sew in all the side seams)


CO 179
1. Right side knit
2.knit
3. K4, *K1, YO, K5, s1 as if to knit, k2tog, PSSO, YO, K1* repaat between * until last 5 sts, K5
4. knit
Repeat Rows 3&4 until end of afgan ending on a knit row
Bind off all stitches.
Now you need to tuck in all your edges if you didn't do this as you went.  I always wait until the end to do this step, just because I don't like to stop in between to get that part done.  Once all your ends are nicely tucked in, you are done and can enjoy your wonderful new comfy blanket.
Fyi in the picture above this is folded in quarters so it is quite a large afghan, which is exactly what I wanted!
If you want it stripped like mine then this is the number of rows at a time in each color you do, and then just repeat until it is the desired length
A-6 rows
B- 2 rows
C-6 rows
B- 2 rows
D-6 rows
B-2 rows
E-8 rows
B 2 rows
*Repeat starting with A

It feels like a bit of heaven on earth. This blanket is so warm, fuzzy, big and cozy.  I love a good blanket to snuggle with while I'm laying on the couch weither it be just chillin or watching a movie, or reading to my babies! It is so nice for this to finally be done. (it has taken me 3yrs, only because I only work on it in Dec/Jan in random spare time)

Sunday, February 26, 2012

Stuffed Animal Hammock-knit

I was looking for something to put all of Eli's stuffed animals in, since he has a ton of them and they seem to take over his crib.  I liked the idea of the animal hammocks, but didn't want to buy one.  I had some extra white yarn sitting around so I decided to get to work and make a pattern for one. So here it goes. This was his other b-day present-practical yes, but he needed it and I wanted an excuse to make it besides just because!

white yarn
Size 13 circle needles

CO2
Knit row
Increase in each st
Knit row
Increase in each st
Knit row
Increase in 1st and last st, knit all sts between
Knit row
Increase in 1st, 5th, and last st, knit all sts between
Knit row
Repeat the above two rows(instead of the 5th st always inc in the middle st of the row) until you have 80sts on needles.
Knit 20 rows
Now you are going to decrease in the same pattern, so it looks even so your decrease row should be:
k2 tog in 1st 2sts, middle 2sts, and last 2sts, knit all sts in between.
Knit row
Continue this until you have 10 sts left on your needles then do as follows:
K2 tog in 1st 2sts, knit and k2tog for last 2 sts
knit row
k2 tog for row
knit row
k2 tog for row
knit row
k2 tog
bind off stitches and leave a long tail so you can tie it all together and you will be able to hang it.

I finally decided to hang this in his closet, low enough so he could get to it, but so they were not just thrown in a pile in the closet!


Saturday, February 25, 2012

Homemade Cough Syrup

Since I have been sick and being pregnant limits the things I can take-which I might add are all the things that actually work.  I decided to do some research and come up with some cough medicine made of food so I can actually take it while pregnant.  Because pregnancy and coughing don't go so well together.  If you are not up peeing, you are up coughing, and if your coughing then you now probably have to pee. It is one vicious cycle!

I found this recipe and made a few changes to it:
1 c honey
1/4c warm water
3 TBSP lemon juice
1/4 tsp ginger

Take all these ingredients and mix them together.  I found they separate slightly so it would be a good idea to put them in a jar or bottle so you can shake it before you take it.  For an adult you take like 1-2 TBSP every 4-6 hrs, and then 1 TBSP if you are a child and 1/2 tsp if you are under 50lbs I think was the recommendation.

This has been the best thing in the past day for me.  My throat has felt like it was on fire from all the talking I have to do(yes I really do have to talk-I have to call people into work!), and the coughing doesn't help that much either.  I do not know how much it kept me from coughing but I was not coughing all day or all night like I have been the past two.  In my opinion some relief is better than none.  Also my sore throat, completely gone-I will continue to take it for this reason alone! I'm serious I can tell when it wears off because my throat starts burning.  You take this stuff and within 20-30min relief! YEAH! I'm one happy momma now that I feel a little better, and I am so glad I found this recipe.  Also it tastes really good because of all the honey in it, much better than any store bought brand I have ever had!

Friday, February 24, 2012

Sick...

I have been really sick this past week, so I really haven't been doing too much of anything.  Hopefully this weekend will be a good time to get some little stuff done around the house.  Maybe I can find something small to sew.  I want to make myself a shirt and I want to make a little girl dress also, we will see!  It is amazing how when you are sick and warn out your baby can still make life all better.  He still loves to snuggle and his snuggles some how make me feel better about my day. I'm so blessed to have such a content little man in my life!
My sweet little ham!

Wednesday, February 22, 2012

Blog Info

This would help me out a lot.  If you have a post that you like a lot or would like to see more of a specific type of post please let me know.  You can let me know you like the post by hitting the +1 button below.  Think of it as similar to the facebook "like" button.  I would greatly appreciate it! And as always please feel free to comment on anything you like or things you may change when doing something as this will give me good ideas and new things to try.  I like to try new things!

Homemade Buns

3 c flour
1 c warm water
1 pkg active dry yeast
1 TBSP sugar
2-3 TBSP olive oil

Add the water and the yeast together.  Let it stand about 10 min, it should look foamy.  If it is not foamy yet, let it stand a little longer.  Then stir in the sugar, flour, and oil.  This will make a firm dough, but should still be able to be easily handled.  If need be you can add a bit more oil.  Knead the dough on a floured surface, then make into a ball.  Grease a bowl, place ball of dough in bowl, turning once to grease both sides of the dough.  Let rise in a warm place for about 30min.  Once it has finished rising.  Divide bread into 6 equal parts.  Roll each of these into a ball(I actually shaped mine more like big puffy squares).  Let rise another 20-30min.  Bake at 400 for 15-20min.  Cut in half and enjoy-these went wonderful with the pulled BBQ pork I made for valentines day!

I forgot to take a picture of these, I am extremely sorry.  Somewhere in the shuffle and bustle the rolls got missed! Next time I make them I will have to take a picture so I can add it!

BBQ Pork Sandwich

Pork shoulder roast
1 onion finely chopped
6 cloves garlic, minced
1 bottle BBQ sauce (16oz)
1/2 c water
1 tsp ginger
1/4 c honey

Place the pork and the onion in the crockpot.  Mix all of the other ingredients together and pour over meat.  Turn crockpot on high for 6 hrs.  When it is done, pick the pork apart with a fork to make it shredded.

To make the sandwich, place on a bun. (I used homemade, recipe to come) and top with some shredded Mozerella chesse.  Made for a delicious lunch. I forgot to take a picture of the sandwich, we must have been too excited to eat them!

Note: Instead of honey this past time I made it, I used brown sugar. (we aren't quite sure if Eli is allergic or not, but he had a funny reaction one time so we are waiting a bit before he gets another taste of it) Still tasted just as good.

Tuesday, February 21, 2012

Baked Apples

Apples- I used Gala those are my favorite for baking
2 tsp cinnamon
1/4 tsp nutmeg
1/4 c brown sugar
2 TBSP butter
1 TBSP raisins

I used 4 apples, since we aren't a big family, so you will need more ingredients if you are going to make more than that.

First, cut the core out of the apple, so you have a hollow center.  Then divide your butter up and place a chunk in each apple.  Mix all the dry ingredients together.  Add a scoop to each apple.  Then top with raisins.  If I have any of the filling left then I sprinkle some on top for some extra sugar!  Bake at 400 for 20-30min. (this depends more on how big the apples are, the bigger they are the longer it is going to take them to get soft.)


Enjoy-just be careful the filling is really hot!

Monday, February 20, 2012

Strawberry/Raspberry Smoothie

2 c Frozen Strawberries
2 c Apple Raspberry Juice
1 c Raspberry
1/4 c Light Yogurt(I always use vanilla because that is what I have in the house for baking purposes)

Throw all this in the blender, and turn on high.  You may have to stop and stir it a few times, but it is more than worth it trust me!  Enjoy!

Oh yeah, this makes 4 cups!

Chocolate Fudge-Easy and Homemade

1 bag chocolate chips
1/2 stick butter
1 can sweet cond. milk

First off I want to say a huge thank you to my good friend for giving me this recipe it has never failed me and always turns out perfect, no matter what I decide to add to it.

Start melting the butter in a saucepan-when it is about half melted add the other two ingredients and stir.  Make sure you stir quite a bit as you don't want any of it to burn or stick to the bottom of the pan.  Pour in a greased 9X9 in pan.  Let cool and enjoy! 

Simple right? Just the way I like it!

Decorating the Kitchen

In decorating the kitchen I have decided on a couple of projects and they will be posted as I get them done.  I am very excited about everything I have dreamed of...now we just have to see if they turn out.  If they don't I will keep you posted too! I want them to all be frugal ideas that look cool.

Paint- I have just finished this.  I painted two phrases in the kitchen one above the fridge that says Bon Appetit, and then a quote I made up in the spice rack which says "LOVE, the magical ingredient of all things made here."

Coffee sign- I want to make a sign that says coffee with the "Fs" looking like steam coming out of the coffee cup.  I would like to make it out of old floor tiles, and coffee filters.  We shall see if this works or not.

Hooks- I want to take the scraps of trim and stain them the same color as the rest of the trim.  I then want to use the old and new door knobs and handles that are left and attach them to this, so I can hang things from them.  Such as aprons or towels-but then I don't have to go buy anything extra.

Rug- I like a rug by the kitchen sink, why I have not a clue it is just something I have always like to have.  Since I don't have one that will match I would make one I think.  I have a feeling this project will take a lot of time, and that I probably won't recommend for others to do it. But I am going to try it any way.  I want to use a latch hook type concept.  But instead of yarn I am going to use all Greg's old white t-shirts since a lot of them have some welding holes in them and will just end up in the trash. (also an excuse to buy him some new ones).  For the base I am probably just going to use one of those anti slip mats since they have holes already in them.

Curtains- Last but not least I should probably make some curtains to go in the window above the sink.  This will be last on my list because I am still not sure what kind I want, there are so many fun patterns out there I can't wait to try so many of them. Anyone have any favorite patterns?

Apron-doesn't sound like a decoration I know, but I would like to make myself an apron (probably after I have the baby) so that when I cook my clothes stay a bit cleaner.  I will probably also make Eli and the new little one too just for kicks and giggles!

I am still trying to think of something to put next to the Starbucks sign in the kitchen on the overhang, so if anyone has any ideas at all please let me know.  Or if you have seen any other cool designs that we think I might be able to attempt to make let me know and I will see what I can come up with.

Potato Chips-Homemade

Let me preface this by saying I never knew that homemade potato chips were so easy to make and that they would taste so good.

4 potatoes
Seasoned salt
3-4 TBSP olive oil

Cut or slice the potatoes as small as you can get them.  About 1/8 of an inch-mine were probably slightly thicker because I didnt' have a slicer I had to cut them by hand and you can only get them so small!  Next place all the potato slices in a bowl with the olive oil.  Gently toss them around so they are coated with a small amount of oil.  Place on a baking sheet-make sure they make a thin layer, try not to overlap them too much or they will come out a bit mushy.  Sprinkle with seasoned salt or the seasoning or your choice.  Bake at 400 for 10-15 min.  Until they look a bit crispy- just don't get them too done.  I found they will still cook some after they come out of the oven and you don't want burnt potato chips those do not taste good.

Saturday, February 18, 2012

Ruffle bottom skirt pattern

First cut out a piece of fabric that is 18"x8".

The first thing I did on this one was to put in the elastic waistband and it worked so much better than putting it in last.
To do this you are going to make a "pocket" for the elastic to go into.-this means I folded the top part of the fabric 1/4" down and ironed it flat(this was so there were no rough edges in the skirt). Next, Fold 1/2" of the fabric over and iron it so it lays flat. Now you are going to put the elastic in the 1/2" fold that you ironed.  The elastic should be 1-2" shorter than the width of your skirt so that it will stretch.  Sew this up, while pulling on the elastic while you are sewing. Now your waistband is done!

Next cut out a strip of fabric that is 1.5xs the width of the skirt and 2" wide.   First hem the bottom part I used a 1/4" seam for this.  You are going to do a gather on the top of this so that it ruffles.  If you want to check out how to do that follow the link here and it will show you.

Now attach the ruffle piece of fabric to the bottom of the skirt.  Pin it so that it stays and you can then make sure you don't need to adjust the ruffle lengths anywhere. (Make sure the right sides of the fabric are together so you won't see any rough edges).  I used a 1/2" seam make sure that the top part where you gathered will be hidden once you turn it the right way.

Now that your bottom is attached to the skirt, sew up your side seam so that it makes a circle and you are done!

Easy and cute right??

Thursday, February 16, 2012

Crepes

Crepes!
Indgredients:
1 c Flour
2 eggs
1/2 c milk
1/2 c water
1 tsp vanilla
2 TBSP butter melted

Mix all the ingredients together.  I mix them all and add the butter after everything else is well blended.  This should not have any chunks in it as crepes are very smooth!


Pour into a greased skillet.  Make sure that you pour the batter into the center of the pan, and then tilt the pan every which way to cover the whole bottom of the pan.  These are thin, so it doesn't take more than 1/4c of batter per crepe!  These don't cook until they are golden brown.  You will filp them when you can tell they are sturdy enough to flip the edges should look like below.  Once flipped they are on the other side for like 30 seconds.  Just pretty much to touch up that side.  Remember they should not be golden brown they should be white still.
For Filling:
1 c yogurt(I use low-fat vanilla)
1/4 c sour cream
3oz cream cheese softened
1 tsp vanilla
4 TBSP powder sugar

Mix all ingredients together, and beat until smooth.

 Now for the assembly:
Put the crepe on a plate, put the filling in the middle, and fold the tops over it (I use a bit of filling to hold the two sides together.
 Now top with whatever you like.  I always use Berry Sauce just because I love it, these ones were blueberry/raspberry!
ENJOY!

Tuesday, February 14, 2012

Valentines Day

Happy Valentines day everyone! It's days like today that I am so grateful to have the best Valentine in the whole world.  My Lord Jesus Christ who died for all my sins, because he loved me enough to want to spend eternity with me.  I hope we all remember the One that paid the ultimate sacrifice on this day of love.

I am also so very thankful to have such a wonderful husband, who gave the the most wonderful son! They both light up my world every day and I couldn't have asked to be blessed any more than I am. And to top it all off in 8 more weeks we will get to meet our baby girl! I love you Greg and I love you Elijah!

This valentines day we decided to be really low key.  I decided to spoil my boys with a magnificent lunch.  We had BBQ pork sandwiches on homemade buns. (I made the buns out of my pizza dough recipe!) We also had baked apples and homemade potato chips.  It was my first attempt at the buns and the potato chips and they both turned out to be a huge hit.  What is valentines day without something sweet (or two things sweet)? For dessert I made Chocolate fudge, and cheesecake brownies! They both were yummy.  To drink we had Strawberry/Raspberry Smoothie.  Needless to say both of my men were very happy with their valentines day present.  Yes I said present.  There was a lot of love and time put into this meal and I tried to make something for everyone.

I will be posting the recipes on these soon.  They were all very good and I would love for everyone to be able to share in my joy and be able to make them for their loved ones.  So keep your eyes peeled. This is going to be a busy week so I will try my best to get them posted as soon as possible!

How to Clean a Paintbrush-Vinegar

Can I just say I never knew there were so many uses for vinegar!  I used to think it was a pretty useless thing sitting around my house, but now I love it for so many things.  I should write a post here soon about everything it is good in and for around the house and body. I'm truly amazed at all its uses.

As a paint brush cleaner:

I boiled about 2 cups of vinegar in an old saucepan.  Once it came to a boil I put the paint brush in the vinegar.  I dipped it in and out a few times since it was so hot. 

Then I started brushing the bottom of the pan with the paintbrush so that it got between all the bristles.  Next, I just let it sit in the pan for about 30 minutes.  About every 5 minutes during this time I would go over and move the brush around the pan, using painting type motions to make sure it got between all the bristles.

Let me just say this worked amazingly.  With all the staining I had done in the kitchen my brush had gotten hard and yucky.  I thought I was going to have to throw it away.  I stumbled across something on the Internet that said you could clean a paint brush with vinegar.  There are so many ways they tell you to do it, and most with so many steps.  I wanted something simple, so I decided to just try the vinegar and the most basic steps.  Guess what it worked!! My paint brush is like new and now I don't have to go and buy a new one to finish all of the basement painting.  I love things that save me money and time.

Monday, February 13, 2012

Kitchen!

I can now say that I have a fully functioning kitchen! My excitment is beyond words!  During this past week I finished sanding down the last of the cabinets, and then I finished staining them.  We went to hang them and of course we ran out of screws and the hardware store in town was already closed.  So the next day we went out got the rest of the screws that we needed! Now guess what, ALL of my cabinets are back in full working order. I have organized everything the way that I want, and I am the happiest person alive, I'm quite sure of it!


We also had a great friend of ours bring over his table saw and miter saw yesterday so we can hopefully get to working on cutting all the trim that is left to go up. Because guess what that is all that is left to do in the kitchen!
Now on to decorating.  I have some really fun ideas, I will see what I can make of them and if they work.  I will definitely be posting about them.  I may even post about them if they fail, just so if you know of a better way to accomplish it, maybe I can get it done.
It looks so much brighter in there the difference is unreal.  You can't really tell how much brighter from the pictures, but even our wonderful roommate said it looked amazing and so much nicer(and he is a man!)

Friday, February 10, 2012

Basement-Painting

Ok so I got antsy, go figure right??

I said the longest wall in the basement was done being sanded right? Soo I decided it was time to prime and paint that wall, just because I can!

Here is it all primed.


Here is it all painted.


I also put my desk back out in the room, so my bill paying can be a bit more organized and I finally got to hang my laundry sign up above the door! (I have had this sign for 2 yrs!!)


It's the little things in life that make life good and enjoyable in my opinion. I was so happy to see color on the wall, just in case you can't really tell from the pictures it is a pale yellow/cream color that is down there.  The lighting is awful sorry.


Now hopefully it will help us get motivated to get moving on the rest of the walls, so we can finally call it a finished project! (well not totally because once I finish the remodel, I will have to find some craft stuff to make for down there)

Thursday, February 9, 2012

Kitchen-Almost There

My Kitchen is getting so close!  No one can fully understand how happy and excited this makes me!!  I literally jump up and down just thinking about it. I just keep thinking about it functioning as a normal kitchen again without dust everywhere, and only one counter I can use. Won't that be so grand! I love to cook and bake so it will be great to have all my counter space back.

Yesterday I got the last of the cabinet doors sanded, and two of them primed.  Now I just need to stain the last 4.  The hardest part about all of this is all the waiting that has to occur.  I have to stain both sides of the cabinet door and each side has to dry for at least 4 hrs in between.  In other words, these last 4 cabinet doors could take me a couple of days to get done.  I can only do 2 at a time because that is the biggest area that I have to place them on while they are drying without ruining anything! So we wait....and wait...and wait. Something I have never been too good at.

But I know it will all be worth it in the end.  Here is a picture of what the cabinets currently look like without the last couple of door on them.
 The insides of the cabinets on top will eventually get painted white, but we ran out of white paint so that will have to wait for a while. Which isn't a huge deal in my mind.

Wednesday, February 8, 2012

Basement- Sanding/Mudding phase

My basement has been in this stage since before Elijah was born.  As you can see from my previous post he is already a year old.  It was time to finish this project!

Here is what it looks like currently, I know it is really messy! Not too much extra storage for all the stuff that has to go in that room!

 I'm so excited for this phase to be over.  It should be over any day now.  I know we have the longest wall done, but as you can see we still have one whole chunk of wall that needs a lot of attention.

My personal deadline for this to be fininshed is the end of February we will see if that happens.  Not that I have doubts but I would like it to be done by then so we can start organizing it before this baby gets here!

Sunday, February 5, 2012

Ktichen-Flooring installation

We are at a pausing point with the trim until we get a table saw, and you know me always in a hurry and antsy as all get out.  So I begged Greg to please let us lay the flooring before we finished putting up all the trim.  He finally said yes! I can't even begin to explain how happy I was about this!

Here is what the floor looked like before:


Pretty old and nasty huh??

Here is the flooring getting installed:
Here is a picture of behind the fridge all finished:
I love the way it looks with the wall colors.  I'm very happy with the way it looks, with how easy it was to install, and that it is done!

By the way this floor was peel n stick tile, so it was super easy to put in, and it was cheap (we bought it on sale)!

We are getting closer to this room finally being done.  I started it around Thanksgiving time I believe and I would like it done by Valentines Day, then I can cook a nice meal it my finished kitchen!

This morning

I got a lot done yesterday, but today will definitely be a day of rest for me  I woke up sooo sore.  I guess this pregnant body of mine isn't used to manual labor from 8am-10pm. Makes for a long, but very productive day.

Was all the hard work worth the aches and pains, YOU BET!  It just changed up my morning a bit.  I took a Tylenol first thing (while my coffee was brewing), and since I have been sitting in a chair with the rice bag.  All the while listening to my little man talk to himself in his room and completely entertain himself.  It is times like this I am even more grateful to have such a happy and content baby. I haven't quite decided if my body is ready to pick up his almost 26lb body!

Greg went out to the shooting range this morning.  I'm sure he is having a blast.  You should know I don't like guns one bit but I broke down and bought him one for his birthday this year.  Needless to say he was very surprised!  So every now and then he goes to the range with his boss, and from the bits that I hear (I don't like to hear too much about it), they have a great time.  He needs some male bonding time.

Below is a picture of his gun (this is on here for his benefit), with his new red dot on it:

Saturday, February 4, 2012

Kitchen Happenings

Today was a very productive day, which always makes me a very happy person!

First, I went grocery shopping (I was out of creamer for my coffee and that makes it an emergency).  Got all that put away, looked around my kitchen and noticed how messy I have been letting it get.

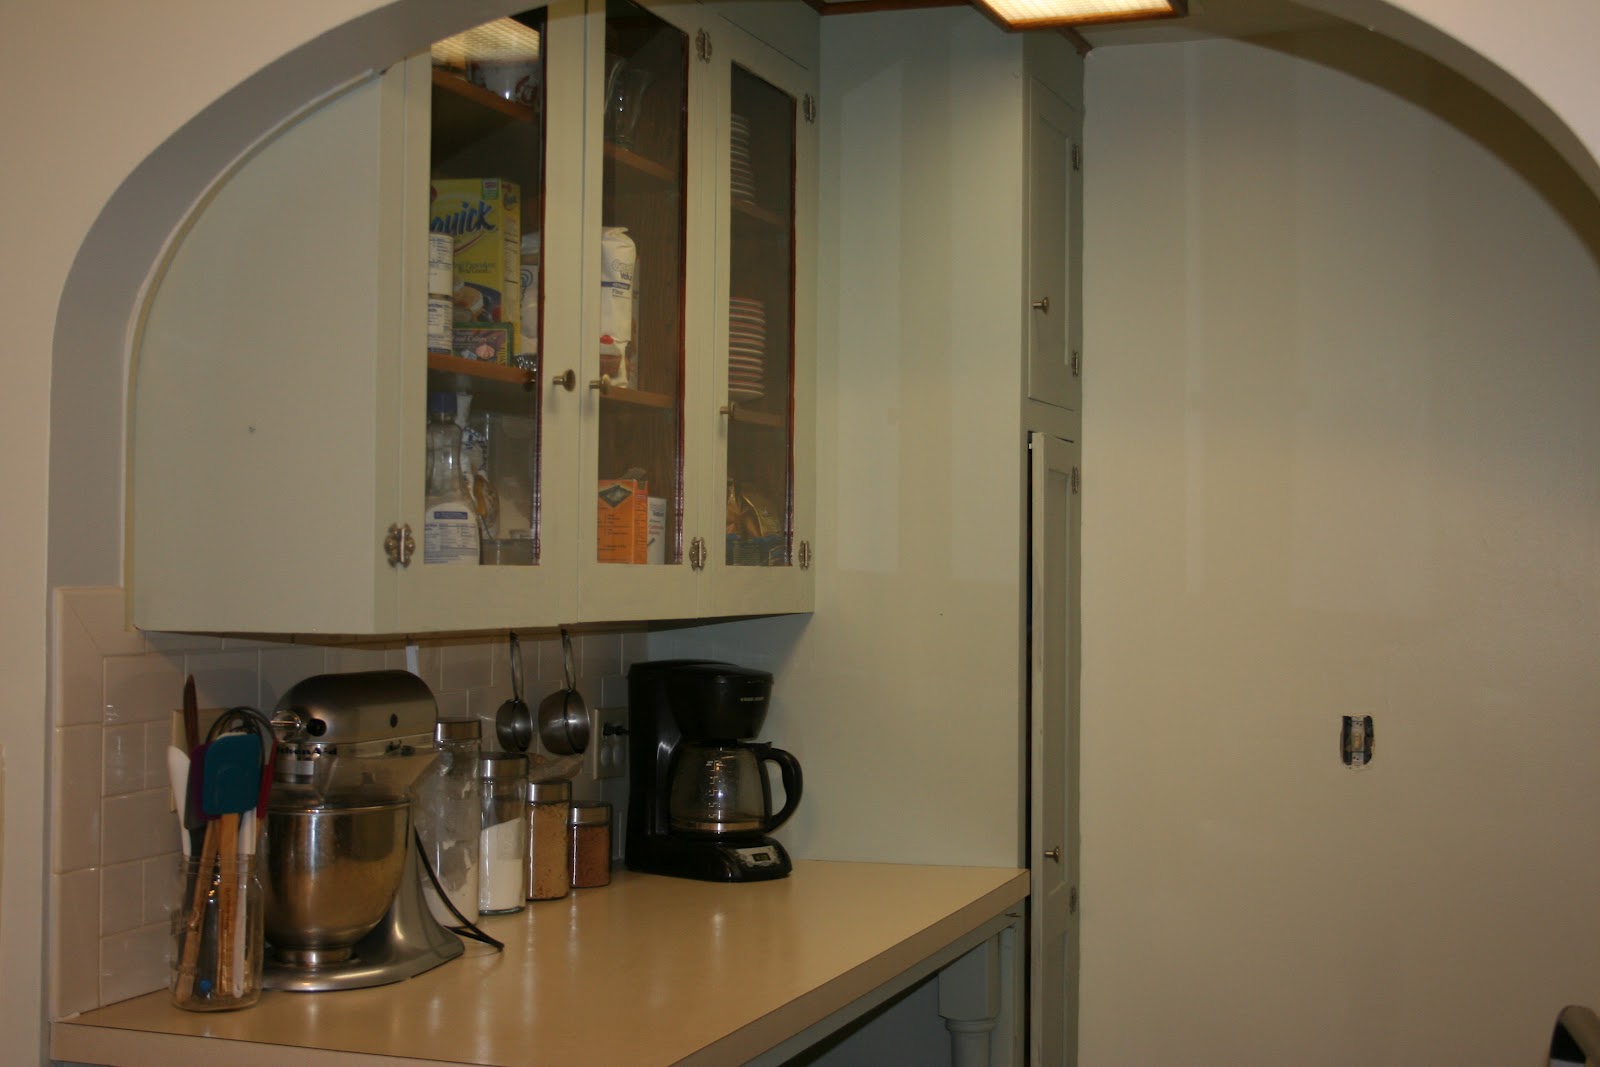
Second, because my kitchen was trashed I got to work cleaning it.  I mean really cleaning it.  I cleaned the oven, the stove top, all the counters.  I washed all the containers and everything that sits on the counters.  I put everything in my new canisters that I made awhile back with the frosty labels.
Third, I organized all the counter space and cabinets so they made a bit more sense based upon where other things were found in the kitchen. I really like the new feel of how it is set up. (I will add here in the last 2 years of living here I have rearranged where things were kept in the kitchen at least 4 times) I'm hoping this will be the last time, and it should be because it makes more sense than the last 4 times as to where everything is located.

Forth, I stained 3 cabinet doors (doesn't seem like a lot but that's all I can fit in one section of my house blocked off so no animals or babies get into it while it's still drying). 

Fifth, I stained the bottom of a long counter top that I have in the kitchen.  There are no cabinets underneath, so I just had to do the legs and then the bottom of the broom closet that it butts up against.  It looks really nice I must say.

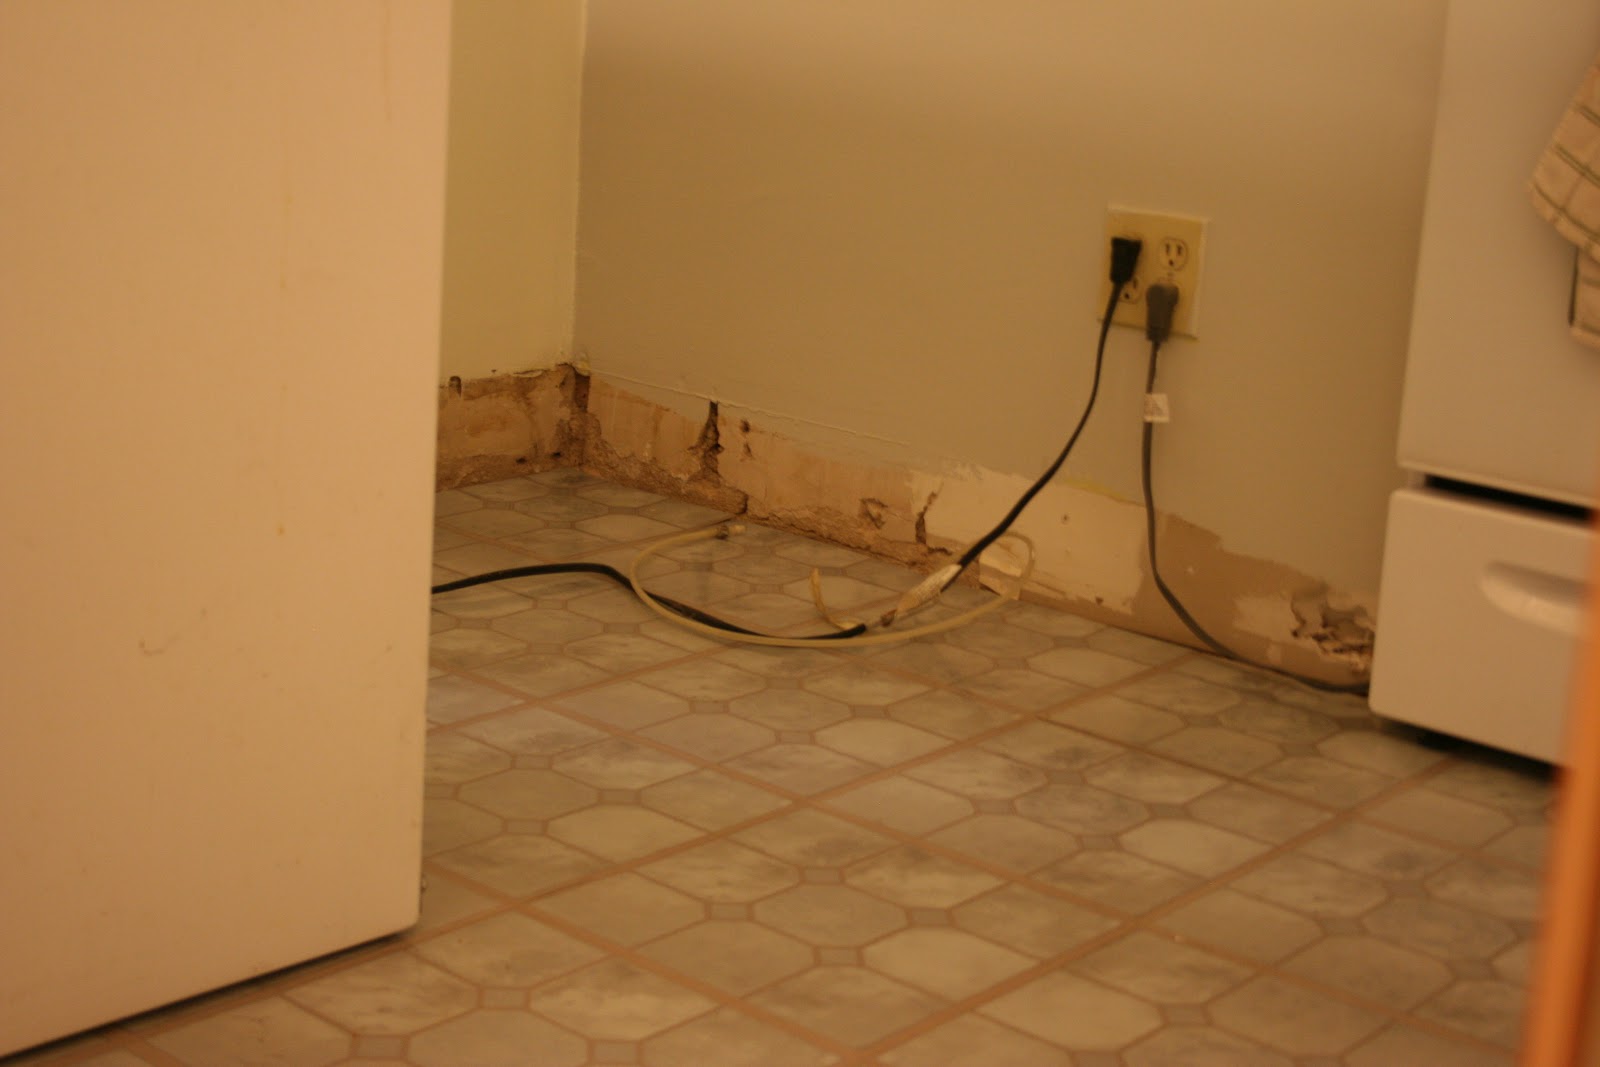
Sixth, we put the flooring in.  Notice this one says we! Greg helped and I was so happy to have him in the kitchen with me. It had been a long day in there. (when I wasn't working on something, I was cooking the next meal, and washing the dishes!)  Eli helped me with the flooring as well.  He saw me patting it in, so we crawled around the floor and would pat all the tiles in as I would lay them down.  It was really cute, I'm wishing now I would have gotten the camera out for that!

Side Note- Greg did a wonderful job keeping Eli occupied so I could get some much needed work done, and I greatly appreciated it.  He also got some sanding and muding done in the basement while Eli was taking his nap.  Also a huge plus, working on two projects at the same time! He is the best husband a women could ask for! I'm telling you, everyone should be jealous(except jealousy is a sin so maybe don't be jealous just be really happy for me that I have such a keeper)

Seventh, As you notice it is a bit late in the evening now, and I just finished putting up those three cabinet doors I stained at the beginning of the day.  I had to wait for them to dry so it was the perfect time to get them up.

And Last but not least, I stained two more cabinet doors so come tomorrow I could get those up, maybe. 

I may just take tomorrow off, and use it as a day of rest as it should be.  After all, I feel quite accomplished after everything that I got done today!  Keep your eye open for some posts of all the things I got done in the kitchen.  I'm tired now so this momma is going to bed, but I will post about at least the floor tomorrow!

Friday, February 3, 2012

Dresser refinish

We recently decided to move my dresser up the Eli's room, so that when the next baby arrives there is room for both of their clothes.  Currently there is just closet space but Eli takes up the closet so figured we needed to add another piece of furniture to the room to accommodate this.  My dresser was a very small one from walmart that we got on sale.  Light Birch/Oak color, so didn't go in the room too well. 

Soooo.... we decided to be different.  The room is currently brown on the bottom, blue on the top.  We decided to be different and paint it in the chalkboard paint.  I couldn't help but think how fun and different this would be.  We could write what items were in the drawers or draw pictures.  The possibilities seem endless.  So very excited.  Greg seemed to really like the idea too, so off we went to walmart to find some paint.  They sell it in a spray can for $4, not too bad.  I am going to use our sidewalk chalk to write on it with so we don't have to buy more chalk.

Before Picture:


After Picture:

Dresser Finished:


Yeah, so excited to fill this with little boy and girl clothes!

Thursday, February 2, 2012

Kitchen- Trim in

This past weekend we were able to get some of the trim done! I was so happy.

Greg cut all the door trim to the length that it needed to be.

Then we both got to work on staining them! I love that part and I love the way it turned out.


Next he put it up for me.  Yeah that means the trim is done around both of the doors. This means we are getting closer.


We just need to find a table saw to borrow so we can cut the baseboards and get those up, unfortunately our house is old so we got wide trim so it matched the rest of the house which means it doesn't fit in his box! But it's going to look amazing once it is up.

Wednesday, February 1, 2012

Quick Note

Just an fyi for anyone who cares! I am going to be spending time the next couple weeks making sure that my basement and kitchen are finished.  Which means the crafting will be on hold, and probably some of the good cooking, but it will be back I promise.  So look for a lot of updates through out the coming weeks on all the progress around the house! I'm in nesting mode and have to make sure this all gets done... After all people I only have about 9 wks left until this baby arrives!!

Kitchen Redo Part 3

The painting is all finished! It feels so good to know that all the hard work as far as taping everything off is all done.
Looks pretty nice!


Now I just really need to get these cabinets finished so I can move onto the next step, trim and then new flooring. I can't wait for those as it will really help to pull everything together and look way more polished. Then comes the best part, using it fully functioning without "stuff" in the way.

Another benifit, once I get these cabinet doors back on, I can put a lock on them so Eli will stop pulling all the dishes onto the floor(which is messy from all the sand from the cabinets). That means I will have less messes to clean(in the kitchen that is), and less dishes to do! Always a plus in my book!