"For I know the plans that I have for you, declares the Lord" Jeremiah 29:11a.
This verse is ringing true for me today(yesterday, ok always, but especially recently)! A great reminder and promise that even when I do NOT know the plans HE does, and HE has it all under control. I need to make sure that my DAILY plans line up with HIS and NOT mine!
The kiddos have been grumpy since daylight savings time. They are waking up earlier and still going to bed at the same time. Their naps are pretty much non existent. Needless to say this makes for looong days, lots of correction, lots of snuggles, and a WHOLE HEAP of patience. And while mommy is lacking on sleep patience some days, change that- some moments, patience can be hard to come by.
After getting everyone ready and dressed, we load up in the van...click, click, click. No this is not the sound of all the car seat buckles, but rather the sound the car is making. No nice Vroom noise, just a bunch of clicks-ugh dead battery! I call my husband to have him listen to the noise over the phone and confirm what I thought may be the problem(I know nothing about cars, so to guess right equals big time score for me!)
Sigh...unload all the kiddos. Athaiah is screaming "No shopping, I go shopping." Note-she is all girl, can you tell? Elijah say "It needs new batteries." Which is his standard saying for what is wrong if something is broken, but yes son, today you are definitely correct. The van needs a new battery. Another sigh, then the verse from above pops into my head. My plans for today must have been my own. I ask semi out loud, "then what are your plans today/
The two little ones run ahead, while I lag behind hauling the heavy car seat, and kind of dragging my feet because MY plans have been changed. I tend to be a creature of habit and don't usually like sudden changes. Although, these sweet children have definitely taught me to be more flexible. Finally, we all make it back to the front door and battle with the dog to make it inside the house. Athaiah immediately starts to rub her eyes so hard I think they might fall out. She goes and gets her blanket, paci, and lulley and tell me she wants to rock. Not 2 minutes later she is asleep. Elijah is playing quietly with cars. My house is peaceful!
Ahhh God, now I know. You had plans for peace today! Much better than my plan of grumpy kids and staying busy running errands, that (if truth be told) can wait until the weekend. What a relief to know that His plans are always better than mine. We had a quiet peaceful morning, Athaiah got an 1.5 hour nap...as you can guess this severely altered her disposition making her a happy girl, rather than one that screams all day. And let me tell you, this girl can scream!
What a wonderful reminder, and promise. As I go about my day I need to consistently remember He knows my plans. I need to make sure that I am following His plans for my life and not my own. I am excited to see what this week holds-with one car we will be staying home all day every day this week. It may just be the wonderful break in life we were looking for.
Tuesday, November 12, 2013
Tuesday, November 5, 2013
Recliner Redo
When I was pregnant with Athaiah we got this wonderful recliner. It truly is wonderful, it is big and comfy. It just had a hole in the side arm rest and was the wrong color. But when has that ever stopped me. That just means it will become a project at a later date right? Well the later date has arrived and now it goes perfectly in the basement!
 To recover this we bought a set of queen size red sheets that were on sale for $9. (We bought the recliner for $10), this means this project was $20 and a very well spent $20(rounding up here people, I promise I can do math!) at that. It is one of my favorite seats in the house, not only does it recline, but it also rocks. Perfect in this house filled with small children who love to climb into laps for story time, or just for some good old fashioned rockin'!

What you will need:
Old Recliner
Queen size sheets(clearance preferred to keep cost down)
staple gun and staples(a lot of staples)
Extra batting if you feel it is needed(we used extra in the arm rests)
Ok it is a bit hard to explain, but we started with the fitted sheet, we cut all the corners and trimmed off all the elastic. Easy enough!
Next we took the recliner apart, top off, and the arm rest removed.
Then, we just laid it over top of the back of the recliner, stapling and pulling it super tight as we went. (Make sure it is centered so you have plenty left to wrap over the front. We started stapling along the bottom(as you can see below), and then worked our ways up the sides and eventually over the back. Also, for positioning purposes, we laid the fabric out super straight on the ground and then laid the top on it, wrapping one end around to staple.


For the bottom half of the chair we put it in the up position(legs up) and started at the bottom. Make sure you take the lever off first!
 Make sure this is centered because this will also wrap around the arms and down the sides. Make sure to pull it tight and staple as you go. (We didn't remove the old fabric, we just put everything on top of it). This project also involved no sewing!! YEAH! Now pull it tight. I know I keep saying that but it is important that it is pulled tight everywhere. Wrap it around the arm rests and down the sides, and staple all along the bottom. Staple well! There is no such thing as too many staples in this project.
 For the arm rests, we used one pillow case for each arm-handy enough right?! We filled the arm rests up with some extra batting we had lying around just for some extra cushion. Then we pulled it tight(LOL) and stapled it all up so it was closed. Do this for both pieces. Now to attach it to the chair. Staple away my friends. Just make sure it looks nice and neat and you will be all set! We did this all by looking, no real pattern or directions, just a lot of pulling fabric around everything, and lots and lots of staples from our staple gun!
Now just put the chair back together. We cut a small hole in the fabric where the lever came from so we could attach it back on. Oh yeah...for the lever we just took off the old fabric and there happened to be a nice plastic lever underneath. We had planned to recover it or to paint it, but turned out it needed nothing, SCORE! So lever goes, back on the bottom, the arm rests are already back on, and then put the top back on the bottom. Close up any loose seams that may need stapled up last minute. and you are done!
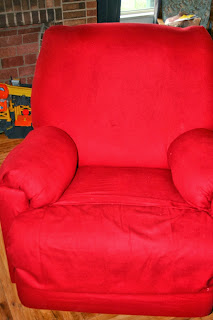 This took us an afternoon during nap time to complete. My wonderful husband helped me with this project, he is great at fixing things and being my other half and helping me come up with my wonderful, crazy ideas that have no pattern! Looks pretty good-what do you think?


What you will need:
Old Recliner
Queen size sheets(clearance preferred to keep cost down)
staple gun and staples(a lot of staples)
Extra batting if you feel it is needed(we used extra in the arm rests)
Ok it is a bit hard to explain, but we started with the fitted sheet, we cut all the corners and trimmed off all the elastic. Easy enough!
Next we took the recliner apart, top off, and the arm rest removed.
Then, we just laid it over top of the back of the recliner, stapling and pulling it super tight as we went. (Make sure it is centered so you have plenty left to wrap over the front. We started stapling along the bottom(as you can see below), and then worked our ways up the sides and eventually over the back. Also, for positioning purposes, we laid the fabric out super straight on the ground and then laid the top on it, wrapping one end around to staple.

Flip it over and continue to straighten everything out, pulling tight and using lots of staples!

*before front was stapled

*After front was stapled
For the bottom half of the chair we put it in the up position(legs up) and started at the bottom. Make sure you take the lever off first!


*Bottom before the arm rests were attached
Now just put the chair back together. We cut a small hole in the fabric where the lever came from so we could attach it back on. Oh yeah...for the lever we just took off the old fabric and there happened to be a nice plastic lever underneath. We had planned to recover it or to paint it, but turned out it needed nothing, SCORE! So lever goes, back on the bottom, the arm rests are already back on, and then put the top back on the bottom. Close up any loose seams that may need stapled up last minute. and you are done!

Friday, November 1, 2013
Thankful Turkey
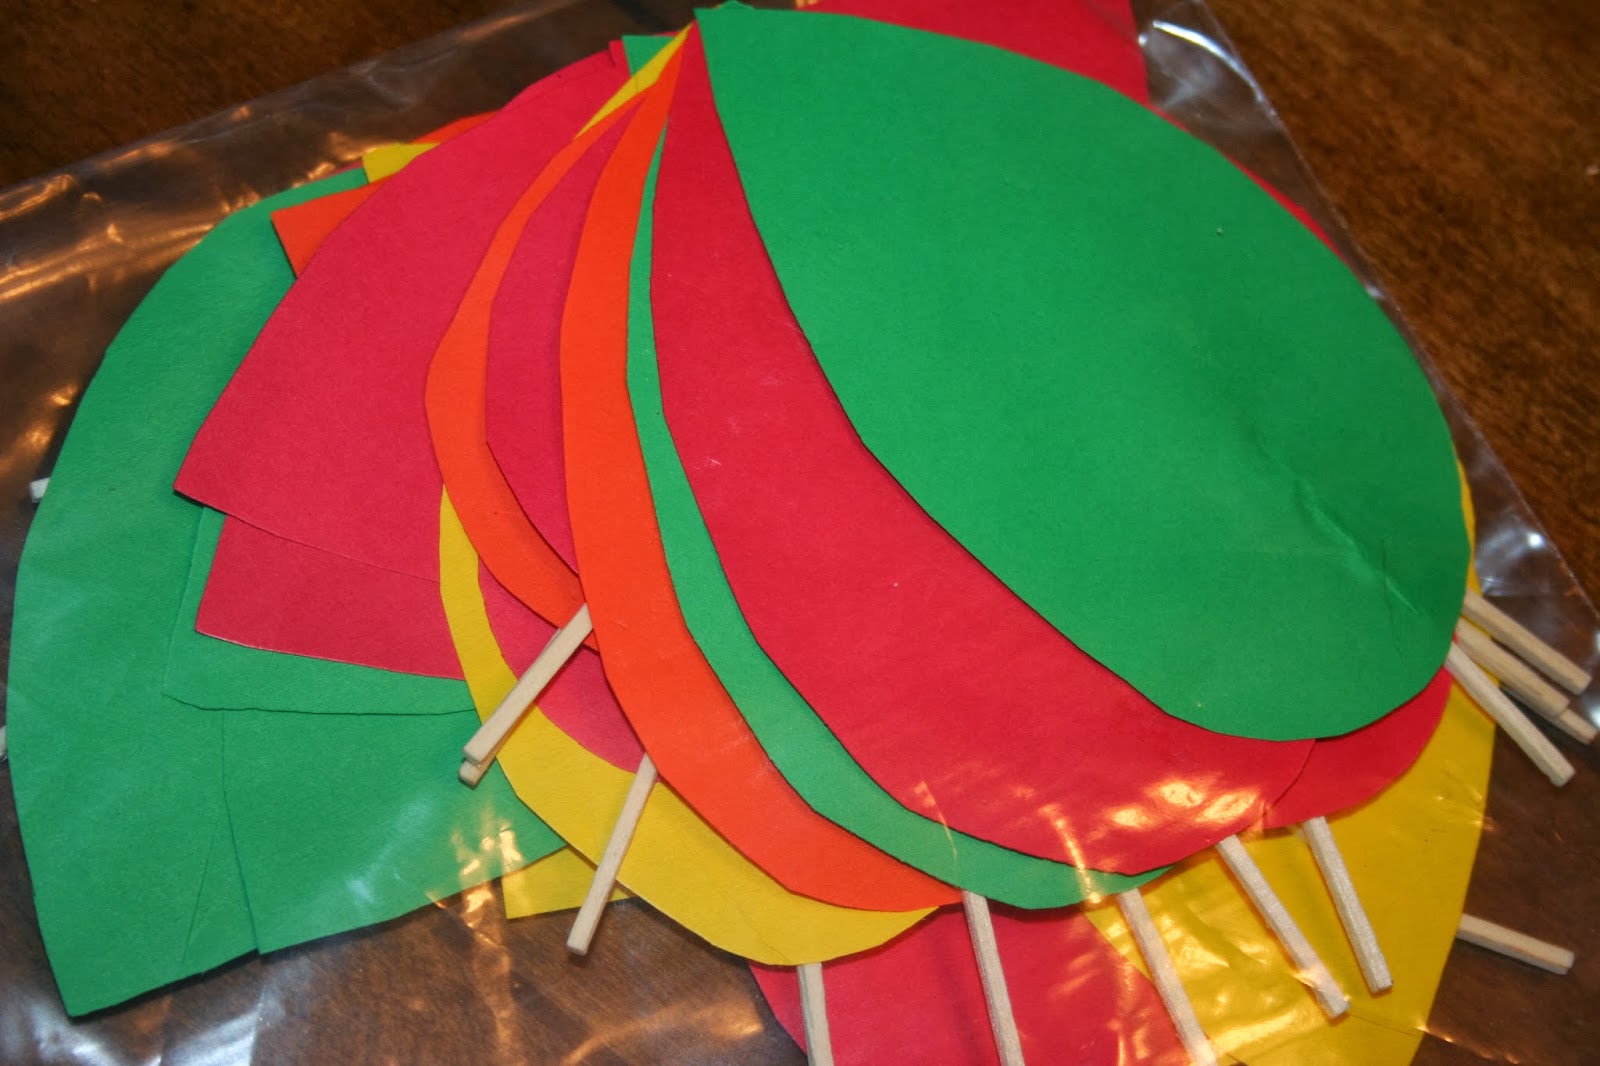
We decided to make a Thankful Turkey this year. I want my children to learn how to be positive and thankful people. We decided to help them recognize the season and being thankful-we would do a month long project.
Elijah helped me make this, and he thought it was so much fun! Got love craft time with mommy! (too bad I didn't get a picture of him helping me, I need to be better about that)
What you need:
2 Foam Balls-1 small and 1 large
Brown spray paint
yellow paint(just a dab)
orange pipe cleaner
2 googly eyes
small wooden sticks(toothpicks)
construction paper(all colors)
glue


 Then for each day we will write something we are thankful for on a feather and place it in the turkey. Look for a full turkey at the end of the month. I am so excited to do this with my kids. I'm hoping it will just help them put thankfulness more into practice. I can't wait to make this a November tradition leading up to Thanksgiving.
Elijah helped me make this, and he thought it was so much fun! Got love craft time with mommy! (too bad I didn't get a picture of him helping me, I need to be better about that)
What you need:
2 Foam Balls-1 small and 1 large
Brown spray paint
yellow paint(just a dab)
orange pipe cleaner
2 googly eyes
small wooden sticks(toothpicks)
construction paper(all colors)
glue

Take your foam balls and spray paint them brown. This took 2 coats!

(this was the 1st coat)
Attach the two balls, do this using 2 of the small wooden sticks
Glue the googly eyes onto the small ball, paint a yellow beak on.
Attach a small portion of the pipe cleaner around the beak-attach it using glue
 (don't mind he eyes, they kept getting a glare on them from the light.)

Put two of the wooden sticks on the bottom to help hold the balls up in a standing position!

Cut out the construction paper to make your feathers and attach a small wooden stick to each with glue.
Subscribe to:
Posts (Atom)