1 c butter softened
1 c sugar
2 egg
3 c self rising flour
2 tsp vanilla
Berry Sauce:
1 c water
2 TBSP corn starch
2 TBSP sugar
2 c strawberries
1 c peaches, peeled and sliced.
In a saucepan combine the water, cornstarch and sugar. Stir until all is dissolved and it starts to get thick. Add the strawberries and peaches. Cook until tender and well blended!
In a 9x13 pan place the berry sauce on the bottom. Then in a mixer combine the sugar and butter until fluffy. Add in the egg, flour, and vanilla. Stir until well blended. Pour over top of the berry sauce. Bake at 350 for 20-30min. The top should be a light golden brown.
This is so amazing! The top is between a strawberry shortcake and a yellow cake mix, it is so good! It looks like a cobbler, but tastes like a cake-doesn't get much better than that!
Enjoy. Sorry I don't have a picture my husband devoured this before I had a chance to get to it!! It was so yummy. This would be so yummy with blueberries, or really any kind of fruit we just happened to have peaches and strawberries and man was it soo good. It is really sweet so have some water or milk on hand.
Friday, August 31, 2012
Tuesday, August 28, 2012
Cobbler
This is one of the best cobbler recipes, and no it's not because I'm biased it just really is amazing. I'm picky about my food, I don't like it to taste too much like a bread or a biscuit because then that just ruins it for me. My camera has been out of commission so I apologize for the lack of pictures lately.
8 TBSP butter
1.5 c self rising flour
1 c sugar
1.5 c milk
1 tsp vanilla
1/2 tsp almond flavoring
4 c fruit of your choice(I have used blueberry, peach, and pear-all amazing)
1/2 c water
1/4 c sugar
In a sauce pan combine the water, sugar, and fruit stir well until it comes to a boil.
In a 9x13 pan place the butter in the pan and put in the oven to melt. Bake at 350! While that is melting combine the flour, sugar, milk, vanilla, and almond in a bowl, mix well so there are no chunks in it! Once the butter is melted, take pan out of over, pour mix over top of butter. Then scoop berries(fruit) over top of batter, then slowly pour sauce over top of berries. I would place a pan below this in the over just in case it overflows-all of mine did just a tad! Bake for 30 minutes.
Oh my goodness is this heavenly! It is moist and yummy, I will try and get a picture up here the next time I make it when I have my camera back.
Thursday, August 23, 2012
Parmesan Crusted Chicken Legs
1 c Parmesan Cheese
1/4 c Italian Bread Crumbs
1 tsp oregano
1/4 tsp parsley
1 tsp garlic powder
1 tsp onion powder
1 egg
splash of milk
4 chicken legs
Take your egg and milk and mix together in a bowl. Add the dry ingredients together in a bowl and mix. Dip your chicken leg first in the egg mixture and coat it well. Then roll it around in all the dry ingredients, make sure the whole leg is covered as good as possible. Place in a baking dish (8x8 works marvelously). Bake at 400 for 45 minutes.
This is absolutely so amazing, my husband ate 3 of the 4! My camera is still out of commission so when I make this again I will try and get a picture up asap. (ugh I hate not having pictures)
Wednesday, August 22, 2012
Jersey knit skirt/yoga style
First you are going to need some measurements.
Measurement A-the width of persons waist minus 2 inches
Measurement B-how long you want it to be(I did mine knee length) (plus 1" for seam allowance)
*When using knit fabric you want to make sure you are always using the side that stretches as your width, so it can stretch up over your hips(if you have wide hips like me).
I don't have any pictures of the process on this one, I apologize, I will look for a tutorial elsewhere to see if I can link it up so if you have questions you can refer to something(I know I'm a visual learner and have to see it in order to do it) http://sewmamasew.com/blog2/2010/06/yoga-skirt-tutorial-tips-on-using-knits/ She explains it really well here and has lots of pictures!
First, we are going to cut out the waistband, so the stretchy side of the fabric needs to equal your measurement A with 1/2" seam allowance. The length of the fabric will be 7 inches, giving you ample room to fold over the top yoga style. I cut mine in one big strip so that I would only have to sew up one side(it's faster that way) Now you are going to sew it up so that it makes a waistband! So sew the short sides together using 1/2" seam allowance. On knit fabric make sure your tension is a bit looser than normal. I had mine on 2, and with most cotton I use 1!
Now you are going to fold it in half yoga style, so it should be about 3.5" tall, fold it so that your side seam is now on the inside.
Onto the main part of the skirt. Cut this the full width of the fabric(stretchy side), this will let it be gathered and give it some fullness so it doesn't stick to you. Of course you don't have to cut it that big if you are making it for a baby, just measure their hips and add like 5" so you can gather it some to make it flow nice! Then you are going to use your measurement B to cut in the length that you want it(not on the stretchy side).
Sew the side seams together using 1/2" seams. Next you are going to hem up the bottom of the skirt. I used about 1/2" seam allowance. You can either sew this using a serger if you have one. I currently don't so I used a zig zag stitch with my tension at a 2 to sew this up. I actually love the way it came out. It isn't too noticeable, but it adds kind of a fun homemade flair!
Now if you want to gather the top so that is is kind of flowy(is that a word?), you can go across the top of the skirt and gather it by pinning it to the waste band and gathering it a bit as you go, or you can use a gather stitch, click here for link on how to do this. Once your fabric is gather(I used the sewing method, I never can manually gather very evenly), pin the waistband to the top of the fabric. This gets tricky to explain-pin it so that the bottom of the waistband is at the top of the skirt, but in order to do this so no seams show, you have to slide the whole waistband over the skirt with that bottom part facing up.(I hope that makes sense, if it doesn't you can always message me and I will try and explain it better). Make sure your fabric is gathered so that it will fit around your hips, then as you sew stretch the waistband so that it will go over your hips. If you make the skirt to match the waistband and you have wide hips the stitches will most likely rip:( Sew this up using a loose stitch(2 still for me). Now turn it all right side out and you have a skirt. The last thing I did was I took out the gather stitches, a bit time consuming, but well worth it because then the skirt will stretch better when you go to put it on.(I would recommend spending the time on this one). Then when you put it on you can fold the top part down. This is such a wonderful skirt. I made one for myself and one for my new little girl and we wore them in May to the wedding(I know took me long enough to post huh??)


I wore this skirt after my C-Section because it felt so comfy and didn't rub on my scar! Also would make a good maternity skirt as it can stretch with you, or just a skirt for comforts sake(always a must for me)
Measurement A-the width of persons waist minus 2 inches
Measurement B-how long you want it to be(I did mine knee length) (plus 1" for seam allowance)
*When using knit fabric you want to make sure you are always using the side that stretches as your width, so it can stretch up over your hips(if you have wide hips like me).
I don't have any pictures of the process on this one, I apologize, I will look for a tutorial elsewhere to see if I can link it up so if you have questions you can refer to something(I know I'm a visual learner and have to see it in order to do it) http://sewmamasew.com/blog2/2010/06/yoga-skirt-tutorial-tips-on-using-knits/ She explains it really well here and has lots of pictures!
First, we are going to cut out the waistband, so the stretchy side of the fabric needs to equal your measurement A with 1/2" seam allowance. The length of the fabric will be 7 inches, giving you ample room to fold over the top yoga style. I cut mine in one big strip so that I would only have to sew up one side(it's faster that way) Now you are going to sew it up so that it makes a waistband! So sew the short sides together using 1/2" seam allowance. On knit fabric make sure your tension is a bit looser than normal. I had mine on 2, and with most cotton I use 1!
Now you are going to fold it in half yoga style, so it should be about 3.5" tall, fold it so that your side seam is now on the inside.
Onto the main part of the skirt. Cut this the full width of the fabric(stretchy side), this will let it be gathered and give it some fullness so it doesn't stick to you. Of course you don't have to cut it that big if you are making it for a baby, just measure their hips and add like 5" so you can gather it some to make it flow nice! Then you are going to use your measurement B to cut in the length that you want it(not on the stretchy side).
Sew the side seams together using 1/2" seams. Next you are going to hem up the bottom of the skirt. I used about 1/2" seam allowance. You can either sew this using a serger if you have one. I currently don't so I used a zig zag stitch with my tension at a 2 to sew this up. I actually love the way it came out. It isn't too noticeable, but it adds kind of a fun homemade flair!
Now if you want to gather the top so that is is kind of flowy(is that a word?), you can go across the top of the skirt and gather it by pinning it to the waste band and gathering it a bit as you go, or you can use a gather stitch, click here for link on how to do this. Once your fabric is gather(I used the sewing method, I never can manually gather very evenly), pin the waistband to the top of the fabric. This gets tricky to explain-pin it so that the bottom of the waistband is at the top of the skirt, but in order to do this so no seams show, you have to slide the whole waistband over the skirt with that bottom part facing up.(I hope that makes sense, if it doesn't you can always message me and I will try and explain it better). Make sure your fabric is gathered so that it will fit around your hips, then as you sew stretch the waistband so that it will go over your hips. If you make the skirt to match the waistband and you have wide hips the stitches will most likely rip:( Sew this up using a loose stitch(2 still for me). Now turn it all right side out and you have a skirt. The last thing I did was I took out the gather stitches, a bit time consuming, but well worth it because then the skirt will stretch better when you go to put it on.(I would recommend spending the time on this one). Then when you put it on you can fold the top part down. This is such a wonderful skirt. I made one for myself and one for my new little girl and we wore them in May to the wedding(I know took me long enough to post huh??)

At the Rehearsal dinner in her new skirt!

At the wedding in my skirt!
I wore this skirt after my C-Section because it felt so comfy and didn't rub on my scar! Also would make a good maternity skirt as it can stretch with you, or just a skirt for comforts sake(always a must for me)
Monday, August 20, 2012
Garlic Butter Salmon
1 Fillet Salmon(about 1lb)2 TBSP butter
3 garlic cloves, minced
2 TBSP onion, chopped fine
2 tsp oregano
1 tsp parsley
1 tsp basil
1/2 c whole milk
1/4 c white cooking wine(or regular wine if you prefer)
1 TBSP olive oil
 In a saucepan put the butter, onion, and garlic. Cook for about 3 minutes stirring often. Add the milk and wine. Stir well. Add the spices. Let this cook on low until it is a thick sauce and a lot of the liquid has cooked out. (This process takes about 20min)
Put the salmon on the grill, brush with olive oil and sprinkle with some seasoned salt(if you wish). Cook salmon for 15min.
*We don't ever flip the salmon and we always buy it with the skin on, so we put the skin side on the grill!
Remove salmon from the grill and immediately cover with the garlic butter sauce! This makes it so moist and flavorful. This is our family's favorite way to eat salmon(and we have several good stand by recipes as we LOVE salmon around here)
Side Note: This is also amazing on grilled pork chops!
3 garlic cloves, minced
2 TBSP onion, chopped fine
2 tsp oregano
1 tsp parsley
1 tsp basil
1/2 c whole milk
1/4 c white cooking wine(or regular wine if you prefer)
1 TBSP olive oil

Put the salmon on the grill, brush with olive oil and sprinkle with some seasoned salt(if you wish). Cook salmon for 15min.
*We don't ever flip the salmon and we always buy it with the skin on, so we put the skin side on the grill!
Remove salmon from the grill and immediately cover with the garlic butter sauce! This makes it so moist and flavorful. This is our family's favorite way to eat salmon(and we have several good stand by recipes as we LOVE salmon around here)
Side Note: This is also amazing on grilled pork chops!
Friday, August 17, 2012
Anniversary
Well today it has been 4 years since I said "I DO" to the man of my dreams. I thought I would take some time to reflect on that time and just thank God for him, because (in my opinion) he is the best husband and father someone could ask for.


 We have done countless other things, gone home for vacation, gone on camping trips with a bunch of crazy college guys(that was fun!!), worked long hours, spent quiet evenings in playing board games and watching movies. Found a favorite restaurant in town(Courtyard), spend Saturdays being lazy together. We have had the joy of watching our little ones and all their firsts! We have the joy of being parents. We have gotten to encourage each other and watch each grow. We have had the privilege of growing up together, so we can sit and reminisce about our upbringing and all the fun times we had together!
I just want to thank you Greg for...
making the last 4 years the most wonderful of my life
2 wonderful children
being godly leader in our home
being my quiet listener
standing beside me through the hard times
rubbing my back, even when you are so exhausted you can barely stay awake
leading our family in worship and Bible reading
teaching our children how to obey
teaching our children how to play, learn, and love
letting me have a dog and 2 cats because I'm animal crazy
being so patient, with both the children and I
always being there
being my husband
loving me no matter what
helping out
encouraging me
being grateful for what I cook, even when it is a failed attempt
always smiling
working so hard-at times 2 jobs to help pay the bills
loving us all
always taking my opinion into consideration
praying with me
being with me
bringing me flowers for no reason
teaching Eli how to treat women and others
showing your daughter how a real man should act(you're a wonderful example)
There is so much more I could thank you for. Thank you for being my wonderful other half! God couldn't have picked a better soul mate for me.
I love you Gregory! Happy 4 year anniversary!
In the past 4 years we said "I do" 8-17-08

We moved to Kansas 8-25-08
We added another cat to the family 9-16-08.

You graduated college 5-24-09!

We bought our first house 11-29-09!

We added a dog to our family 3-26-10.

We had baby #1 on 1-24-11!

We had baby #2 on 4-6-12!

I just want to thank you Greg for...
making the last 4 years the most wonderful of my life
2 wonderful children
being godly leader in our home
being my quiet listener
standing beside me through the hard times
rubbing my back, even when you are so exhausted you can barely stay awake
leading our family in worship and Bible reading
teaching our children how to obey
teaching our children how to play, learn, and love
letting me have a dog and 2 cats because I'm animal crazy
being so patient, with both the children and I
always being there
being my husband
loving me no matter what
helping out
encouraging me
being grateful for what I cook, even when it is a failed attempt
always smiling
working so hard-at times 2 jobs to help pay the bills
loving us all
always taking my opinion into consideration
praying with me
being with me
bringing me flowers for no reason
teaching Eli how to treat women and others
showing your daughter how a real man should act(you're a wonderful example)
There is so much more I could thank you for. Thank you for being my wonderful other half! God couldn't have picked a better soul mate for me.
I love you Gregory! Happy 4 year anniversary!
Tuesday, August 14, 2012
Shepherd's Pie
1 lb ground beef
tomato sauce(recipe below, or you can use a can)
5 cloves of garlic, divided, minced
4 TBSP chopped onion
1 oz bag of mixed veggies(I used green beans, peas, carrots, and corn)
2 TBSP Worcester sauce
1/4 c water
4 TBSP butter, divided
4 potatoes, peeled and cut
1/4 c sour cream
1/2 c shredded cheese( I used colby jack)
 Place the potatoes in a sauce pan and cover with a with water(fill about 1" above the potatoes) Bring to a boil and cook until potatoes are soft. This usually takes 15-20 min.
While the potatoes are cooking put 3 TBSP butter, onion, and 3 garlic cloves(minced) in a skillet and cook for about 2 min. Add in the ground beef. When the beef is all browned, add veggies, water, Worcester sauce,and tomato sauce. Cook until the veggies are tender. Place in the bottom of a 9x11 pan.
Now on to finishing up the potatoes, once they are soft put the potatoes in a mixer(or a bowl if you are going to hand mix them), add sour cream, 2 (minced) garlic cloves, and 1 TBSP butter. Beat until they are creamy and fluffy. Put this over top of your meat and veggie mixture.
Next put the shredded cheese all over the top of the potatoes. Place in the oven at 350 for 20min or until all the cheese is melted.
ENJOY!
Tomato Sauce
1 tsp basil
1 tsp oregano
1 tsp parsley
10 Roma tomatoes
First, you are going to blanch the tomatoes. To do this bring a pot of water to boil. Then add the tomatoes. Keep them in the water for 1 minute. Next transfer the tomatoes to a bowl of cold water. Let them set for about 1 minute in the cold water. Then you just peel the skins right off! When they are warm the seeds just fall right out of them, and I like as little seeds as possible in my tomato sauce!
In a blender or food processor, place the tomatoes, and the herbs. Blend until well mixed and sauce like. You are done and have a wonderful fresh tomato sauce. If you have fresh herbs it will taste even better!
tomato sauce(recipe below, or you can use a can)
5 cloves of garlic, divided, minced
4 TBSP chopped onion
1 oz bag of mixed veggies(I used green beans, peas, carrots, and corn)
2 TBSP Worcester sauce
1/4 c water
4 TBSP butter, divided
4 potatoes, peeled and cut
1/4 c sour cream
1/2 c shredded cheese( I used colby jack)

While the potatoes are cooking put 3 TBSP butter, onion, and 3 garlic cloves(minced) in a skillet and cook for about 2 min. Add in the ground beef. When the beef is all browned, add veggies, water, Worcester sauce,and tomato sauce. Cook until the veggies are tender. Place in the bottom of a 9x11 pan.
Now on to finishing up the potatoes, once they are soft put the potatoes in a mixer(or a bowl if you are going to hand mix them), add sour cream, 2 (minced) garlic cloves, and 1 TBSP butter. Beat until they are creamy and fluffy. Put this over top of your meat and veggie mixture.
Next put the shredded cheese all over the top of the potatoes. Place in the oven at 350 for 20min or until all the cheese is melted.
ENJOY!
Tomato Sauce
1 tsp basil
1 tsp oregano
1 tsp parsley
10 Roma tomatoes
First, you are going to blanch the tomatoes. To do this bring a pot of water to boil. Then add the tomatoes. Keep them in the water for 1 minute. Next transfer the tomatoes to a bowl of cold water. Let them set for about 1 minute in the cold water. Then you just peel the skins right off! When they are warm the seeds just fall right out of them, and I like as little seeds as possible in my tomato sauce!
In a blender or food processor, place the tomatoes, and the herbs. Blend until well mixed and sauce like. You are done and have a wonderful fresh tomato sauce. If you have fresh herbs it will taste even better!
Sunday, August 12, 2012
Hair cut
Elijah got his first hair cut with the clippers yesterday!
I must say he did an amazing job sitting still and the noise didn't scare him a bit!

Now he looks like mommy's big boy!

Car Wash
Today we decided to have some fun and in this house that means it must have to do with cars!
So we washed the new van!


Sometime you just have to stop and take a drink!

The girls chillin'!
Side Note: I think we all need a bit more sun, we look paasty!
Saturday, August 11, 2012
Garden
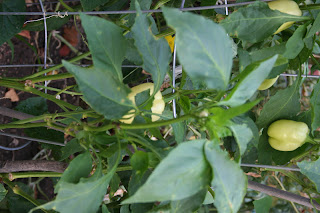
I haven't written about my wonderful garden in quite awhile so I guess it is high time I do so!
My carrots are still coming along wonderfully. I picked some last week and they are still quite small, but definitely still growing. I think I will leave them in the ground for another 2 weeks and see where they are after that.
 My tomato plants, still keep bearing fruit on a regular basis. I have now made 2 different types of salsa. I need to get that second recipe on here. In case you missed the first one click here! I have also made a small batch of pasta sauce that I made some spaghetti with and then I made a tomato sauce that I put in my shepherd's pie. That recipe will be coming soon so keep your eye out for that one!

My broccoli continues to grow. I have 5 heads coming in off my biggest plant that I have already harvested once, and my other 3 plants are looking like they are going to start blooming any day here! So excited, broccoli is my favorite veggie!
 I thought the heat had done the cucumber plants in, but when I went outside yesterday to start cleaning some stuff up in the garden it has come back to life!! It has a lot of flowers on it, so hopefully we will be getting some more cucumbers here soon!

Then pepper plants have done fantastic since adding the Epsom salt to the soil. It is amazing what that did for them! They have like 5-6 peppers on each plant. I also had one plant that looked dead and it has perked right up. It has yet to yield any crops but it looks a ton better than it was, which is great in my book!
My carrots are still coming along wonderfully. I picked some last week and they are still quite small, but definitely still growing. I think I will leave them in the ground for another 2 weeks and see where they are after that.


My broccoli continues to grow. I have 5 heads coming in off my biggest plant that I have already harvested once, and my other 3 plants are looking like they are going to start blooming any day here! So excited, broccoli is my favorite veggie!


Then pepper plants have done fantastic since adding the Epsom salt to the soil. It is amazing what that did for them! They have like 5-6 peppers on each plant. I also had one plant that looked dead and it has perked right up. It has yet to yield any crops but it looks a ton better than it was, which is great in my book!

Well there is the wonderful update on how things are growing around here! It truly is the gift that just keep giving!
Thursday, August 9, 2012
Baked Bbq Spare Ribs
1/2 18 oz bottle BBQ sauce(I used Kraft honey)
3 spare ribs(I forget the lbs but they were big)
1 tsp garlic powder
1 tsp onion powder
1/2 tsp seasoned salt
water
Place the ribs in a 9x11 baking pan. Fill the pan with water so that the ribs are about 1/2 way covered in water. Sprinkle with the garlic, onion, and salt. Bake at 250 for 1 hour. Turn the meat over at 30 min. When cooking for an hour, take the ribs out and drain the water from the pan. Turn the oven up to 400. Pour BBQ sauce over the ribs. Bake for 30min. The ribs should be nice and tender!
These were sooo good. I had to come up with a baked recipe because we ran out of propane the day before. This would be perfect in the winter when you don't want to go outside and grill.
Wednesday, August 8, 2012
Fix 'em up
Today I finally got to my mending pile!


 Looks like it was a great day and it was so good to get all of these checked off my to do list!
I had Elijah's duck wing to sew up. One of his favorite stuffed animals from his Great Grandma and Grandpa Luurtsema.

Much better now!

Greg had two pairs of shorts that needed buttons sewn back on.

All done!

And last Greg had a pair of pj pants that ripped on the seam, so that needed to be fixed.

Check!

Tuesday, August 7, 2012
Exercise Check In
Accomplishments:
It has been about 3 weeks since I started going on my almost daily walks! I can't believe I have made it that long. I have never been able to stick to something that long in my whole life! So that right there is a huge accomplishment! I feel so much better about myself which is what it is really all about.
I have made my 2 mile walk/jog about 1/3 jogging and 2/3 walking which is a huge improvement for me. My toes hurt and my ankles hurt, which means I really should look into getting some better shoes, but for now they work.
I have cut my time from 45 minutes to 30 minutes, just because I can jog a bit more. I think next week I am going to try and add another mile to it and see how long it takes me to walk/jog 3 miles. Just for something fun since it will mark 4 weeks of this, I think I need something a bit different.
I am down to about 3/4 of a cup of coffee a day, and the amount of creamer that I now put in it is about half of what I used to.
In the past 3 weeks I have lost 10 lbs, and about 5" total all over. That makes me one very happy mommy. I still have quite a bit to lose, but hey I'm getting somewhere and it has only been 3 weeks!
My goals for the next month:
Start walking between 3 and 4 miles!
Jog about half and walk about half!
Sign up for a 5-10k sometime this fall!
Keep at it!
Starting toning everywhere!
Maybe next week I will post an updated photo since it will mark a month of walking. We shall see. I know I have a lot more energy than I used to, and I don't feel like I need a nap every day-which is a wonderful feeling. This is seriously one of the best things I can do for myself and I'm loving every minute of it. I like the quiet of the walk, as Elijah takes everything in, and Athaiah usually naps. I like just being outside(before it gets too hot), and I love the fresh air! I will keep you posted!
Thursday, August 2, 2012
New Van
This may not be huge to some people, but I have seriously wanted a minivan since high school(just ask my parents). I finally have one!! It was a bit dirty when we got it as they agreed to knock the price down from what it was already lowered to if we agreed to take it as is.
 So my wonderful boys got to work on it this weekend and now it looks as good as it did pulling off the lot for the first time(at least I think so). They didn't wash the outside since it was supposed to rain, but the inside is all sparkly clean.
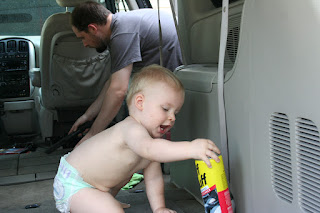


Elijah had such a good time helping daddy, he was giggling and he stuck the vacuum to his face once(I didn't catch it on camera) He brought his cars outside too and when he wasn't helping daddy he was playing with cars, and watching daddy work.

He took a small break to drive the car.

And of course you have to turn the radio on while you're working!
Wednesday, August 1, 2012
Snacks Continued
Here are some of the other snacks that we made on Monday:
Peanut Butter Chocolate Bananas:
2 bananas sliced (I got about 15 slices per banana-they were huge bananas)
1/4 c peanut butter
1/2 c choc chips
 Melt the peanut butter and chocolate chips together. Either in microwave or on the stove top. I did mine on the stove-I like to be difficult! Place a piece of wax paper on a cookie sheet and then arrange the banana slices. Now I did this the cheap way, if you want them to look really nice then roll them in the chocolate so they are all coated in the choc. and peanut butter. I didn't really care what they looked like because just my family was eating them, so I just took a spoonful of the mixture and placed it on top of the banana, I let it kind of fall down over the top of the slice so most of the sides of the banana slice were covered as well. Then stick in the freezer at least until set (about 1 hr). Theses are so rich I can only eat 1 at a time, but they are sooo yummy! I then moved them to a freezer bag-they didn't hardly make it to the next day, my husband and son devoured them while I was at work.
Fruit Snacks:
1/3 c water
1 package sugar free jell (.44oz)
1 packages gelatin not flavored (.25 oz ea)
 In a sauce pan heat the water, and stir in all the gelatin until it is dissolved. Then pour into a container of your choice to harden. Let set for about 30min and the enjoy. Just to give you an idea, I put mine in regular sized ice cube trays. Once they were set I took them out and sliced them into smaller pieces. (It made about 12 ice cubes worth, only filled 1/2 full) Out of each "ice cube" I got 8 pieces. It makes quite a bit. They are super yummy even sugar free.
*I have seen a lot of these lately and some use juice of fruit puree or really whatever you want to use, so go ahead and be creative. I did and they turned out just fine. In order to get them "tough" like a fruit snack just make sure you use a little extra gelatin and less water and they should come out fine. Let me know if you make any fun versions of this!
Peanut Butter Chocolate Bananas:
2 bananas sliced (I got about 15 slices per banana-they were huge bananas)
1/4 c peanut butter
1/2 c choc chips

Fruit Snacks:
1/3 c water
1 package sugar free jell (.44oz)
1 packages gelatin not flavored (.25 oz ea)

*I have seen a lot of these lately and some use juice of fruit puree or really whatever you want to use, so go ahead and be creative. I did and they turned out just fine. In order to get them "tough" like a fruit snack just make sure you use a little extra gelatin and less water and they should come out fine. Let me know if you make any fun versions of this!
Subscribe to:
Comments (Atom)