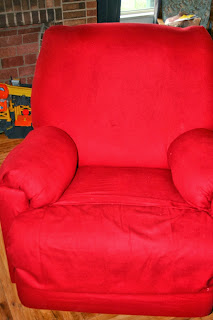
To recover this we bought a set of queen size red sheets that were on sale for $9. (We bought the recliner for $10), this means this project was $20 and a very well spent $20(rounding up here people, I promise I can do math!) at that. It is one of my favorite seats in the house, not only does it recline, but it also rocks. Perfect in this house filled with small children who love to climb into laps for story time, or just for some good old fashioned rockin'!
What you will need:
Old Recliner
Queen size sheets(clearance preferred to keep cost down)
staple gun and staples(a lot of staples)
Extra batting if you feel it is needed(we used extra in the arm rests)
Ok it is a bit hard to explain, but we started with the fitted sheet, we cut all the corners and trimmed off all the elastic. Easy enough!
Next we took the recliner apart, top off, and the arm rest removed.
Then, we just laid it over top of the back of the recliner, stapling and pulling it super tight as we went. (Make sure it is centered so you have plenty left to wrap over the front. We started stapling along the bottom(as you can see below), and then worked our ways up the sides and eventually over the back. Also, for positioning purposes, we laid the fabric out super straight on the ground and then laid the top on it, wrapping one end around to staple.
Flip it over and continue to straighten everything out, pulling tight and using lots of staples!
*before front was stapled
*After front was stapled
For the bottom half of the chair we put it in the up position(legs up) and started at the bottom. Make sure you take the lever off first!
Make sure this is centered because this will also wrap around the arms and down the sides. Make sure to pull it tight and staple as you go. (We didn't remove the old fabric, we just put everything on top of it). This project also involved no sewing!! YEAH! Now pull it tight. I know I keep saying that but it is important that it is pulled tight everywhere. Wrap it around the arm rests and down the sides, and staple all along the bottom. Staple well! There is no such thing as too many staples in this project.
*Bottom before the arm rests were attached
Now just put the chair back together. We cut a small hole in the fabric where the lever came from so we could attach it back on. Oh yeah...for the lever we just took off the old fabric and there happened to be a nice plastic lever underneath. We had planned to recover it or to paint it, but turned out it needed nothing, SCORE! So lever goes, back on the bottom, the arm rests are already back on, and then put the top back on the bottom. Close up any loose seams that may need stapled up last minute. and you are done!
This took us an afternoon during nap time to complete. My wonderful husband helped me with this project, he is great at fixing things and being my other half and helping me come up with my wonderful, crazy ideas that have no pattern! Looks pretty good-what do you think?


No comments:
Post a Comment